Home > User Guides > VLE Guide for Instructors > Grading Students’ Progress and Knowledge > Additional Gradebook Options & Grading Methods
Additional Gradebook Options & Grading Methods
By changing settings in your gradebook, you can control how grades are displayed to students, including showing grades as a numeric score (Real), percentage, or letter. By default, activities use the Grade type of Points, with the Maximum points set at 100.
On the Letters tab in the gradebook, you can customize grade boundaries by matching ranges of scores to letter grades (e.g., 93.00-100.00 for A). Then when grading, enter the number that matches the letter grade you want to assign (e.g., 89 for a B+), or upload numeric scores from a spreadsheet. When the system generates letter grades, it will match numeric scores to the ranges in the Letters settings and display the correct letter grade to students.
Note: Grade items associated with activities allow only numeric scores to be entered. Letter grades can be typed directly in the gradebook or uploaded from a spreadsheet only for manually created grade items that are set to the Letter grade type.
Display Grades with Letters and Percentages
This page explains the settings involved when first creating a lesson. To add a lesson to your course page:
With the editing turned on at the course main page, locate the section you wish to add your lesson then click the Add an activity or resource link and choose Lesson. All settings may be expanded by clicking the Expand all link at the top right corner.
Configure the following lesson settings:
Letter Grades
Grade letters, also called letter grades, are symbols used to represent a range of grades. For example, “A” could be used to represent grades of 80% and above, “B” to represent grades between 70 and 80%, “C” to represent grades between 50 and 70%, and so on. Alternatively, you could have “Pass” for grades above 50% and “Fail” for grades below 50%.
It is only possible to import letter grades from a spreadsheet (e.g., Excel) into an existing Letter grade column. You must create the Grade item before importing letter grades.
Numeric grades calculated outside of the system will appear as letters if imported into a numeric grade item set to display letters.
There can only be one points-to-letter grade scheme in a course. Individual grade items cannot have different conversion schemes. Once a scheme is set, it will be used for all items set to display as letter grades.
Edit Grade Letter Boundaries
If you are entering numeric values, you can customize the numeric-to-letter conversion scheme in your course.
Once a Letter Grade item is added to a gradebook, you cannot adjust Grade Letter Boundaries unless you delete all letter grade items. Be sure to set the grading scheme before adding any Letter Grade items.
1. Go to the Gradebook page. See Gradebook Views to access the gradebook page.
2. In the navigation tabs (at top), click Letters. The Grade letters page will open showing the values currently being used to convert scores to letter grades.
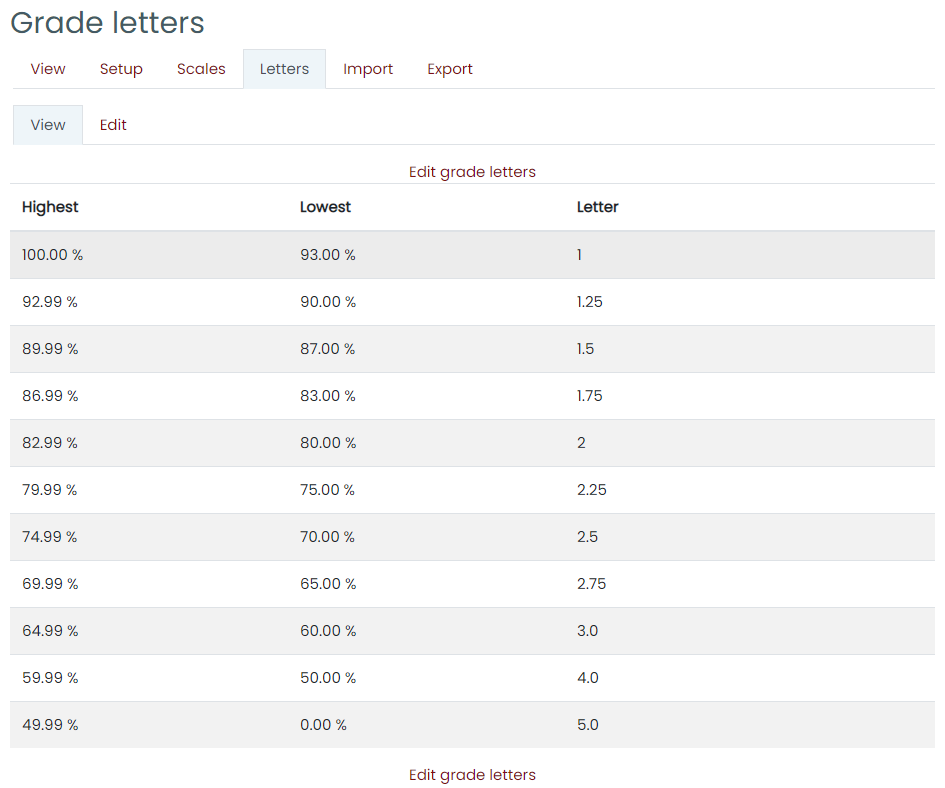
3. Select Edit grade letters at the top of the scores. The Edit grade letters page will open.
Note: You can also open the Edit grade letters page by selecting the Edit tab (second row, at top).
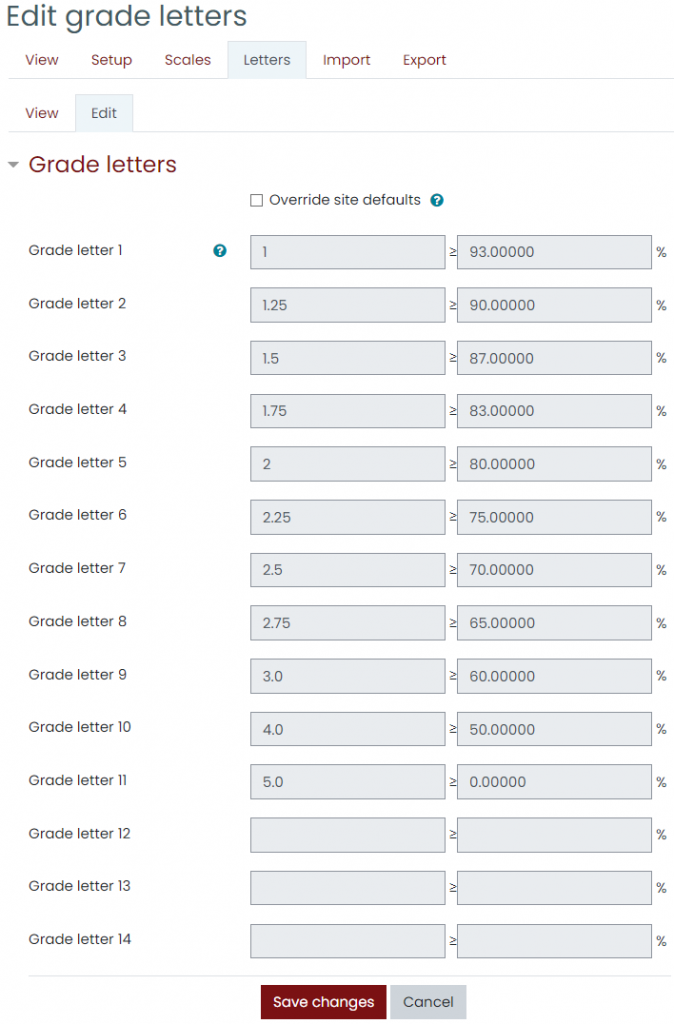
4. To edit the grade boundary values, select the check box to Override site defaults. The fields for Grade letters and Letter grade boundaries will unlock and become editable. Note: Letters A and F must correspond to maximum and minimum, respectively.
5. Enter new grade letters and/or boundary values as required. Note: Numerical values will display as rounded to the second decimal place, but Letter grade boundaries can have up to 5 decimal places.
6. At the bottom of the page, select Save changes.
Display Letter Grades for Numerical Scores
Setting a numeric grade item to display a letter grade will not “lock” your Grade Letter Boundary scheme (as happens if you add a manual Letter grade item). However, since there is only one grading scheme allowed for the entire course, adjusting the scheme will affect the letter grades displayed for all grade items.
Note: Even if a numerical column is set to display letter grades, when editing is turned on in the Grader report, you must read and input numerical values.
To have numerical grade items and category totals display letter grades:
- Go to the Gradebook page, select the Setup tab and Gradebook Setup. See Gradebook Views to access the gradebook page.
- On the Gradebook setup page, under the Actions column, in the row for a grade item or category title, select Edit. The Edit drop-down menu will open. From the Edit drop-down menu, click Edit settings. The Edit page for this item will open.
- Depending on which item you selected, click either the Grade item or Category total heading to expand the page.
- Below the list of settings, select Show more….
- In the Grade display type drop-down menu, select Letter. Note: This setting allows up to two grade display types (e.g., by selecting Letter (percentage), the grade will display as “B (85%)”).
- Scroll to the bottom of the page and select Save changes. You will be returned to the Gradebook setup page. Your new settings will change how the grade displays on the User report and the Grader report when editing is turned off.
Use a Manual Letter Grade Item as the Course Total
If you have added a Letter grade column for the purpose of importing Course total grades, you need to give the Course total column a formula to pull the grades from the Letter grade item into the Course total column:
- Add a grade item. In the Grade type drop-down menu, select Letter. See Adding a Grade Item for more information.
- Go to the Gradebook page, select the Setup tab and Gradebook Setup. See Gradebook Views to access the gradebook page.
- In the row for Course total, select Edit. The Edit drop-down menu will open. From the Edit drop-down menu select Edit calculation. The Edit calculation page will open.
- Scroll down to ID numbers and locate the Letter grade column you wish to use for your course total.
- In the text entry box for your Letter grade item, enter an ID name or number (e.g., FinalLetterGrade).
- Select Add ID numbers. The ID will show on the page after your Letter grade item surrounded by double-brackets (e.g., [[FinalLetterGrade]]).
- Stay on the Edit Calculation page and scroll up to the top of the page. In the Calculation entry box, enter the formula: = [[ID Number]] (e.g., = [[FinalLetterGrade]]).
- Select Save changes. A Recalculating grades page will open. Select Continue. You will be returned to the Gradebook setup page.
- Check to ensure that the grades from your Letter grade item are appearing in the Course total column.
Grade with Rubrics and Non-numeric Scales
If you want alternative methods for evaluating student work, some activities support grading with rubrics and non-numeric scales.
Rubrics are useful when you want to assess student work using multiple criteria. In Assignment activities, you can use advanced grading options to configure a rubric and criteria, and then when grading, the rubric will calculate an overall score. To configure and grade with a rubric.
Custom Scales are for when you want students to see Excellent, Good, Fair, etc., as a grade on an item instead of a numerical score. While custom scales can be used to display non-numeric assessments (e.g., ?-, ?, and ?+), the gradebook will still be able to do calculations with these items if needed.
Rubrics
Rubrics are advanced grading forms that are useful for ensuring consistent grading practices, especially when grading as a team. Rubrics consist of a set of criteria and an evaluation scale with levels corresponding to point values. The raw rubric score is calculated as a sum of all criteria grades. The final grade is calculated by comparing the actual score with the worst/best possible score.
Marking Guides
Marking guides are a simple alternative to rubrics.
When grading with a Marking guide, you will design a simple set of criteria and then, when assessing student work, a form is presented where they can leave a comment and a score for each criterion. The form then totals the scores to calculate a grade according to the Grade settings for the assignment.
Unlike a Rubric, a Marking guide does not let you rank each criterion according to more than one level; rather, each criterion has one comment box, and one box for entering a numeric score.
Note: Assignments and Workshops directly use Rubrics or Marking guides. To grade other activity types with a rubric, you can set up a separate assignment just for marking.
Create a New Rubric or Marking Guide
To create a new Rubric or Marking Guide for an Assignment:
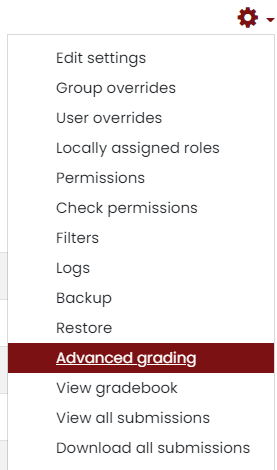
1. Open the Assignment, and in the Actions menu in the top right corner of the assignments page, click Advanced grading.
2. The Advanced grading page will open. Under Change Active Grading Method, select Rubric or Marking guide.
Note: If you are creating a new assignment, under Grade, from the Grading method drop-down menu, select Rubric or Marking guide. Click Save and Display and the Advanced grading page will open.
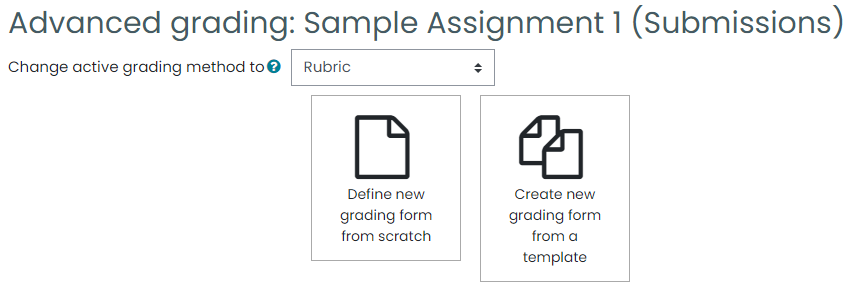
3. On the Advanced grading page, click Define new grading form from scratch. The Define rubric or Define marking guide page will open.

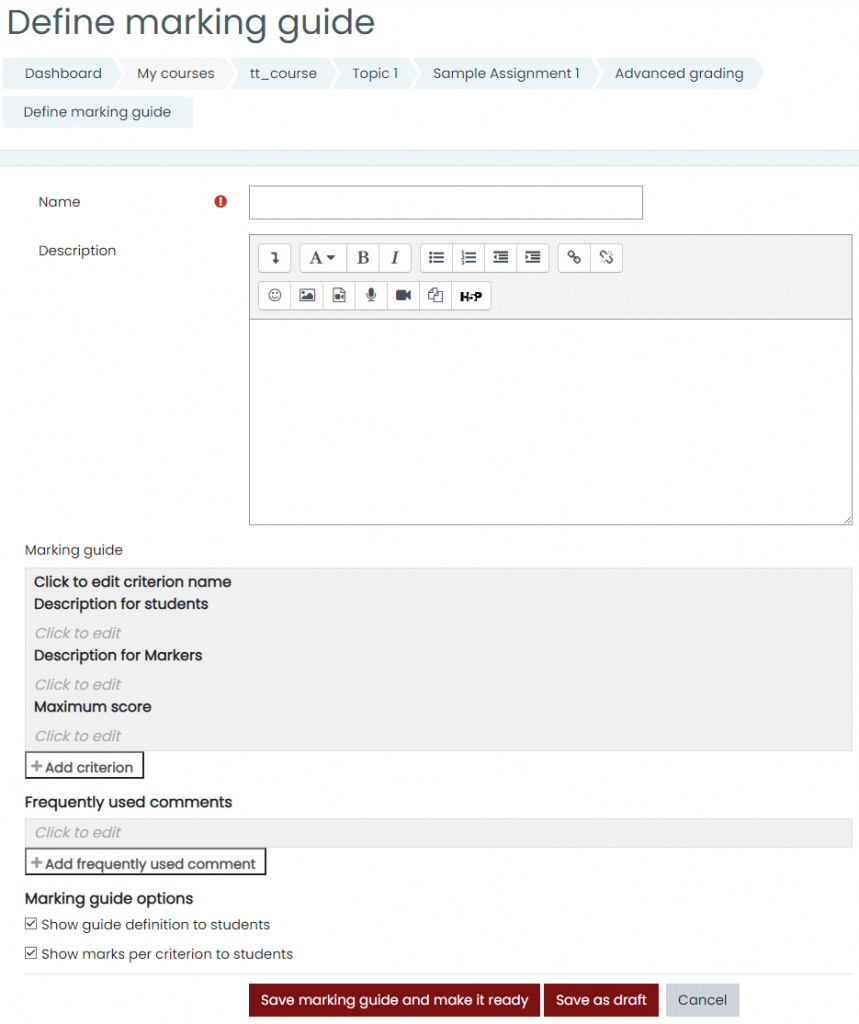
4. Enter a Name and Description for the grading form.
5. To add criteria (the specific elements to be graded): For a Rubric, the rubric will start out with one blank criterion in a row. For a Marking guide, the Marking guide will start out with one criterion in a box.
For a Rubric:
- Select Click to edit criterion. A blank entry box will appear. Enter a description for the Criterion.
- The following boxes represent Levels for rating student performance. Graders will select the level that best describes the student’s performance for that criterion. For each level, select Click to edit level to add a description. To edit the points awarded for each level, click the points value.
Note: You must start with a level that has a point value of ZERO (e.g., scale ranging from 0-3). If you do not include a “0” level, the rubric grade will not calculate correctly.
- To add a level, click Add level (at right). A new column will be added to the row.
- To add a criterion, click + Add criterion (below row at left). A new editable box will appear. A new row will be added to the rubric table, opened to a description entry box. Enter the criterion description and edit the descriptions (and point values, if needed) for the levels.
- To delete a criterion or a level, click Delete (X) icon.
- To duplicate a criterion, click the Duplicate criterion icon (below the X at top left). This allows you to quickly make a copy of a row that you can then edit.
For a Marking guide:
- To reorder criteria, click the up or down arrows.
- Select Click to edit criterion name to add a Name for the criterion.
- Below Description for Students, Description for Markers, and Maximum mark, select Click to edit to edit the fields.
- To add additional criterion, click + Add criterion.
- To add preset comments, you can add for your criteria when grading, click + Add frequently used comment.
Select the Rubric options or Marking guide options for the assignment: These mostly control how much of the rubric your students can see and when; and for Rubrics, whether graders will have an entry box for additional text comments.
When you have filled out all the criterion and definitions, click Save rubric/marking guide and make it ready. You can also click Save as draft to save without having to complete the criterion and level definitions.
Note: You can always come back and edit your rubric by opening the Assignment, navigating to the Actions Menu (Actions menu icon) >Advanced grading, and clicking Define rubric.
Standard & Custom Grading Scales
An alternative to giving numerical grades on an activity is to use Grading scales. You could either opt to use a preconfigured standard scale or create a custom grading scale.
Grading scales are best for record keeping purposes and other assessments you do not intend to factor into the course total in your gradebook. However, keep in mind that the system still assigns numerical values to each term within the scale to do mathematical operations (see below). Depending on your gradebook setup, these values can impact your grade calculations in ways you may not intend.
Standard Grading Scales
- Separate and Connected ways of knowing: Mostly separate knowing, Separate and connected, Mostly connected knowing.
- Default competence scale: Not yet competent, Competent.
How Grading Scales Work
The aggregation method used with scales affects scores. While you and your students will see the values assigned by a grading scale in the Grader report and User report, these values will function numerically in grade book calculations, depending on the kind of grade calculation being used.
- Natural: The first value in the scale is given the value of 1, and subsequent values are assigned the next whole number (e.g., “Very Poor” = 1, “Poor” = 2, “Fair” = 3, “Good” = 4, “Excellent” = 5).
- Mean of grades or Custom weights: The first value in the scale is given the value of 0, and subsequent values are assigned the next whole number (e.g., “Very Poor” = 0, “Poor” = 1, “Fair” = 2, “Good” = 3, “Excellent” = 4).
Using Scales to replicate a standard letter scale is not recommended:
While you could create a conventional letter scale using a custom scale, doing so may have unexpected effects on grade calculation because of the way each letter is assigned a numerical value.
F (1), D (2), D+ (3), C- (4), C (5), C+ (6), B- (7), B (8), B+ (9), A- (10), A (11)
When using a custom scale like this instance, calculating a grade percentage will not align with the traditional letter scale. For instance, a C on the scale above would be equivalent to 45% (5 / 11). If you want to see grades in your gradebook displayed as letter grades, it may be simpler to edit the category settings and change the display mode.
Depending on your gradebook setup, these values can impact your grade calculations in ways you may not intend.
Create a Custom Grading Scale
1. Go to the Gradebook page. See Gradebook Views to access the gradebook page.
2. In the navigation tabs (at top), click Scales. The Course scales page will open as shown below.
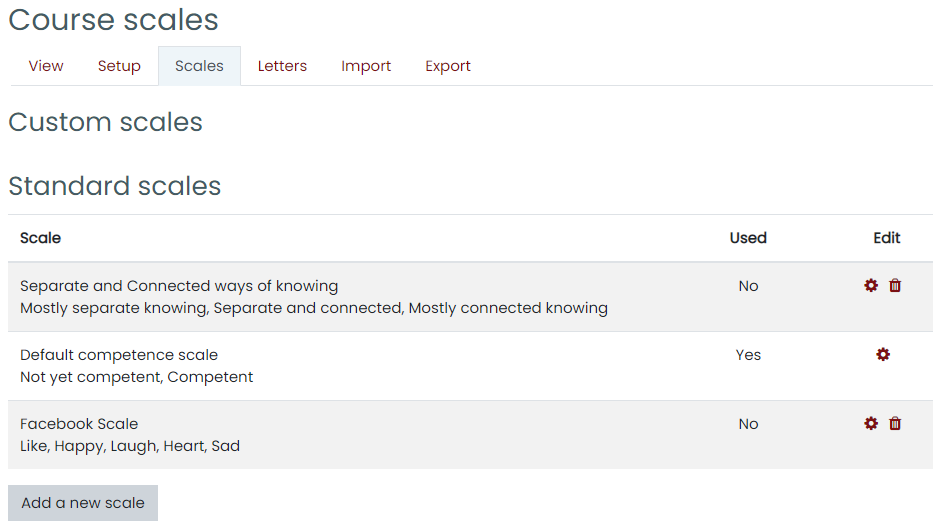
3. At the bottom of the page, click Add a new scale. The Scale page will open.
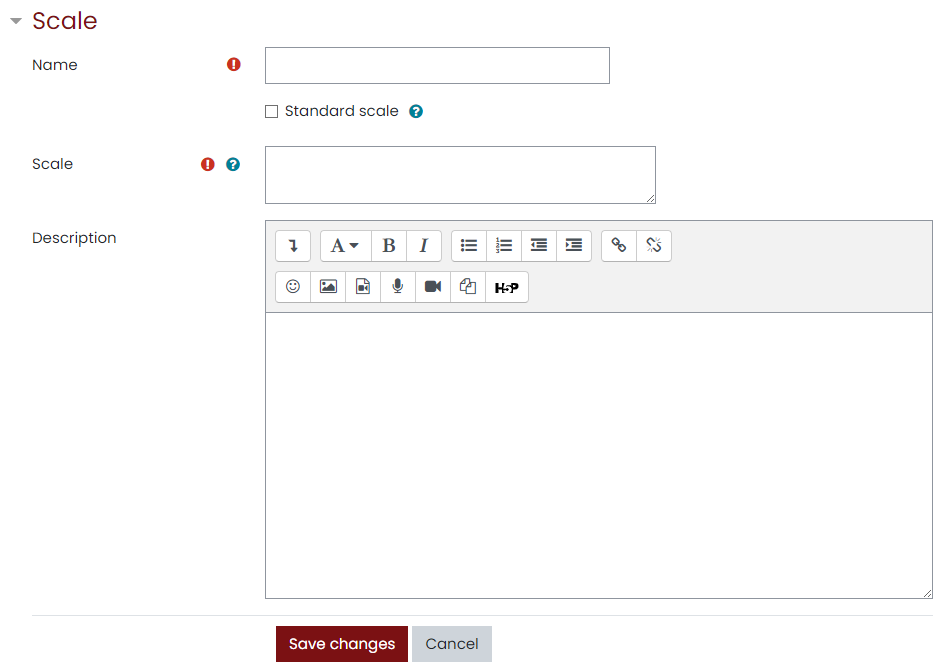
4. Type a name for your scale in the Name box.
5. Enter the actual terms of your scale in order from least to greatest, separated by commas (e.g. “Very Poor, Poor, Fair, Good, Excellent”).
6. (Optional) Enter a description for your scale.
7. Click Save Changes when complete.
Apply a Scale to a Grade Item or Category Total
After creating a custom scale, it can be used with a grade item or category total by editing advanced settings.
- Go to the Gradebook page, select the Setup tab and Gradebook Setup. See Gradebook Views to access the gradebook page.
- Under Actions, in the row for a Grade item or Category title, click Edit. A drop-down menu will open. From the drop-down menu, select Edit settings. The Edit page for this item will open.
- On the Edit page, click to the Grade item or Category total heading to view and adjust the settings.
- In the Grade type drop-down menu, select Scale. (If you do not see this option, click Show more… to view all options.)
- In the Scale drop-down menu, select the name of the scale.
- Scroll to the bottom of the page and click Save changes.
Set a Scale Grade Item to Not Aggregate
Any grade item on the gradebook can be set to not aggregate in the calculation of the grade book. To set a scale grade item to not aggregate:
- Go to the Gradebook page, select the Setup tab and Gradebook Setup. See Gradebook Views to access the gradebook page.
- Locate the row for the grade item you wish to edit, go to the Weights column, and change the value to ‘0‘.
Note: This option will not be available if using the Mean of grades aggregation method.
Note: If using the Natural aggregation method, click the checkbox next to the weight to enable edits of the weight column. - Click Save Changes when complete.