Home > User Guides > VLE Guide for Instructors > Adding Communication Modules > Adding a Zoom Meeting to your Course
Adding a Zoom Meeting to your Course
Zoom is a video and web conferencing platform that gives authorized users the ability to host online meetings. You can now add Zoom meetings as course activities in the VLE. They have a few special configuration options. Once in the meeting itself, all the usual Zoom features are available.
Make sure that your Zoom account email address is the same as your VLE email address (UP Mail address).
Zoom meeting settings
This page explains the settings involved when first creating a zoom meeting. To add a meeting to your course page:
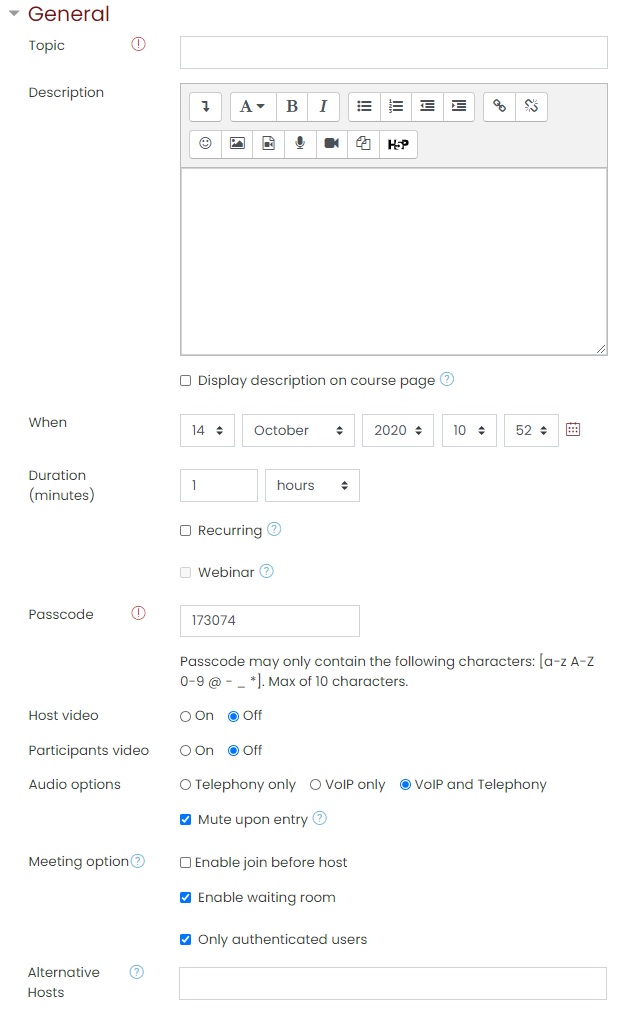
With the editing turned on at the course main page, locate the section you wish to add your zoom meeting then click the Add an activity or resource link and choose Zoom meeting. All settings may be expanded by clicking the Expand all link at the top right corner.
Configure the following zoom meeting settings:
General
- Topic
- Enter a meeting name or subject here.
- Description
- You can provide a longer-form description in this field. You may use formatted text, links, images, and so on.
- Display description on course page
- If this box is ticked, the description will appear on the course page just below the name of the lesson.
- When
- Set the date and time for your meeting.
- Duration
- Set the length of the meeting.
- If this is to be a regularly-occurring meeting and has no end date, select Recurring.
- If it’s a webinar rather than a standard meeting, select Webinar.
- Passcode
- Enter the password of the meeting in this field.
- Note: A known issue with non-password-protected meeting is that anyone with the URL can enter them. Configure accordingly.
- Passcode requirements:
- – Have a minimum of 8 characters
- – Have at least of 1 letter (a-z, A-Z)
- – Have at least 1 number (0-9)
- – Have at least 1 special character (@ – _ *)
- – Include both uppercase and lowercase characters
- – Cannot contain consecutive characters (e.g. “11111”,”12345″,”abcde”,”qwert”)
- Host Video
- Tick the appropriate buttons (On or Off) for the host’s video mode when they enter the meeting.
- Participants video
- Tick the appropriate buttons (On or Off) for the participant’s video mode when they enter the meeting.
- Audio options
- Set your audio preferences. Telephony means the user call in via telephone (cell or landline). VoIP means they’ll use the computer’s audio. VoIP and Telephony allows participants to use either option.
- Mute upon entry: Automatically mute all participants when they join the meeting. The host controls whether participants can unmute themselves.
- Meeting option
- Enable join before host: if this is selected, meeting participants are allowed to join the virtual meeting room before the host arrives, or in the event that the host cannot attend.
- Enable waiting room: if this is selected, the host is allowed to manually admit participants individually or as a group.
- Only authenticated users: only authenticated users will be allowed to enter the meeting (On is the default – it is recommended not changing this without a specific reason)
- Alternative hosts
- The alternative host option allows you to schedule meetings and designate another user to start the meeting or webinar if you are unable to. This user will receive an email notifying them that they’ve been added as an alternative host, with a link to start the meeting. Separate multiple emails by comma (without spaces).

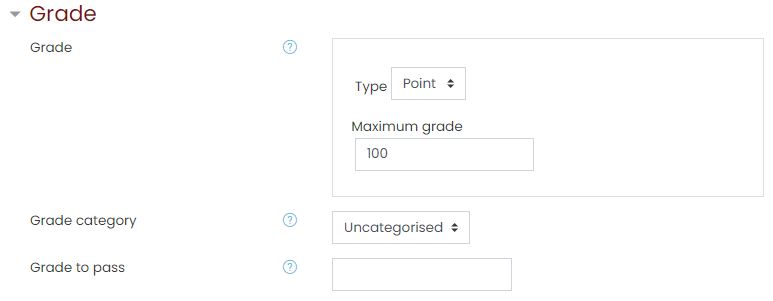
Grade
Set a grade and grade category here, along with a “Grade to pass” which may be connected with activity completion such that a student will not be able to access a follow up activity until they have obtained the required grade in the lesson.

Other settings
Choose the ‘Common module’, ‘Restrict access’, ‘Activity Completion’, and ‘Tags’ settings as you would when you set up any resource or activity. These general settings are further discussed in Activities and Resources: General Settings.
Click the Save and return to course button to return to the course main page. You will see the link to the zoom meeting activity, with the zoom icon in front of it. Clicking on the title will take you to the zoom meeting page. As an alternative to clicking the Save and return to course button, you can preview what the zoom meeting page looks like by clicking the Save and display button.
Managing Zoom Meetings
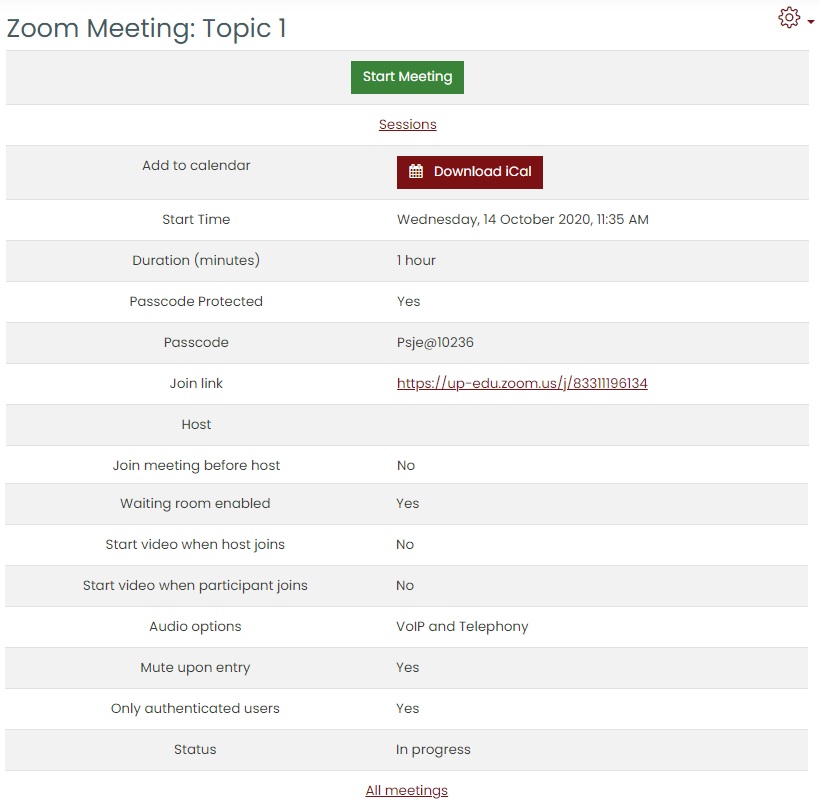
Click the Zoom meeting link on your course main page. The image below shows an example of a Zoom meeting page in the VLE.

Start or Join Meeting
1.) On your course page, click the Zoom activity link you created. The Zoom activity will open.
2.) On the Zoom activity page, on the Upcoming Meetings tab, for the upcoming meeting, click Start. The Zoom meeting launcher page will open.
If you have installed the Zoom desktop application, the Open zoom.us window will open. Click to open zoom.us to begin using the app.
Note: If you have not yet installed the Zoom desktop application on your device, you will be prompted to open or save the installation file and follow installation instructions. Once you have downloaded Zoom.
If you want to use your browser to host the meeting, click the start from your browser link.
3.) Your meeting will begin. Select Join with Computer Audio to join the meeting. For more information on running a Zoom meeting, please see the Zoom Help Center.
4.) When you are finished, click End meeting. If you record your meeting, you will receive a notification based on how you chose to save it.
View and Export Attendance Report in Zoom
- Navigate to https://up-edu.zoom.us/. Click Sign in and enter your UP mail and password. The Zoom page will open.
- On the left hand side of the Zoom page, click Reports. The Reports page will open.
- On the Reports page, select Usage. The Usage page will open.
- On the Usage page, for the meeting you want to see the attendance for, click the number in the Participants column. The Meeting participants window will open.
- On the Meeting participants window, you will see a list of users. To export the report, click Export. The file will download.