Home > User Guides > VLE Guide for Instructors > Quizzing and Testing > Setting Up Various Types of Questions
Setting Up Various Types of Questions
Multiple choice
Types of Multiple choice
You can create single-answer and multiple-answer questions, include pictures, sound, or other media in the question and/or answer options and weigh individual answers.
- Single-answer questions
- These questions allow one and only one answer to be chosen by providing radio buttons next to the answers. You can specify negative or non-negative marks for each answer, usually zero marks for wrong answers, maximum marks for correct answers and partial marks for partially correct answers. A single-answer Multiple Choice question can result in a negative grade if its behaviour is set to Deferred feedback, but not other modes (Adaptive mode, Interactive with multiple tries, etc.)
- Multiple-answer questions
- The teacher can select “multiple answers are allowed” in a Multiple Choice question type. “Multiple answers” questions types in a quiz allow one or more answers to be chosen by providing check boxes next to the answers. Each answer may carry a positive or negative grade, so that choosing ALL the options will not necessarily result in good grade. If the total grade is negative, then the total grade for this question will be zero.
- Feedback can be associated either with specific answers, or with the question.
Question setup
- Select the question category.
- Give the question a descriptive name. You will use the name to track your questions later so “Question 1” is not a good idea. The name will be used in the question lists on the quiz editing page. It will not be shown to the students, so you can choose any name that makes sense to you and possibly other teachers.
- Create the question text. Select an image to display if you want to add a picture to the question. For the student, the image appears immediately after the question text and before the answer options.
- Set the ‘default question grade’ (i.e. the maximum number of marks for this question).
- Set the ‘Penalty factor’. The ‘penalty factor’ only applies when the question is used in a quiz using adaptive mode – i.e. where the student is allowed multiple attempts at a question even within the same attempt at the quiz. If the penalty factor is more than 0, then the student will lose that proportion of the maximum grade upon each successive attempt. For example, if the default question grade is 10, and the penalty factor is 0.2, then each successive attempt after the first one will incur a penalty of 0.2 x 10 = 2 points.
- If you wish, add general feedback. This is text that appears to the student after he/she has answered the question.
- Choose whether students can only select one answer or multiple answers
- Choose whether to shuffle the answer options
- Write your first answer in the Choice 1 text field. Inserting HTML into this area also makes it possible to add an image or a sound file.
- Select a grade percentage for the answer. This is the percentage of the total points for the question that selecting this response is worth. You can select negative percentages as well as positive percentages. So, selecting a correct response in a multiple answer question may give you 50% of the possible points, while selecting a wrong answer may take away 10%. Note that in a multiple-answer question, the positive grades must add up to at least 100%.
Be aware that if you allow multiple answers and have more than a single correct choice, and do not use a negative grade percentage for wrong answers, the students can simply tick all choices and get the full grade.
- If you wish, you can add feedback for each response. It may be a bit more work, but it is good practice to tell the students why each answer is right or wrong using the feedback area. If students know why an answer is right or wrong, they can analyze their own thinking and begin to understand why an answer is correct. Your feedback will only be displayed if you select Show Feedback in the quiz body options.
- Fill in the rest of the response choices in the rest of the form. Any unused areas will be ignored.
- Fill in the overall feedback fields if you wish.
- Select the “Save Changes” button at the bottom of the screen.
True/False
A student is given only two choices for an answer in this kind of question: True or False. The question content can include an image or html code.
When feedback is enabled, the appropriate feedback message is shown to the student after the answer. For example, if the correct answer is “False”, but they answer “True” (getting it wrong) then the “True” feedback is shown.
Question setup
- Select the question category.
- Give the question a descriptive name – this allows you to identify it in the question bank.
- Enter a question in the ‘question text’ field. That can include an image to display if you want to add a picture to the question.
- Set the ‘default question grade’ (i.e. the maximum number of marks for this question).
- If you wish, add general feedback. This is text that appears to the student after he/she has answered the question.
- Select the correct answer – true or false.
- Finally, provide feedback for each of the answers ‘true’ and ‘false’.
- Click ‘Save changes’ to add the question to the category.
Matching
Matching questions have a content area and a list of names or statements which must be correctly matched against another list of names or statements. For example, “Match the Capital with the Country” with the two lists “Canada, Italy, Japan” and “Ottawa, Rome, Tokyo”. In the Quiz Module, each match is equally weighted to contribute towards the grade for the total question.
Question setup
- Select the question category.
- Give the question a descriptive name – this allows you to identify it in the question bank.
- Enter some instructions in the ‘Question text’ field to tell the students what they are matching.
- Set the ‘Default mark’ (i.e. the maximum number of points for this question).
- If you wish, add general feedback. This is text that appears to the student after he/she has answered the question.
- Check the ‘shuffle’ box if you want the answers in the drop-down menus to be shuffled. Note: The Quiz display setting must also be set to shuffle within a question for this to work.
- For the first matching item, enter the question and a matching answer.
- Fill in at least two questions and three answers. Click ‘Blanks for 3 more questions’ to add more. You can enter as many as 10 items. You can provide extra wrong answers by giving an answer with a blank question.
Set the ‘Penalty for each incorrect try’. The ‘penalty factor’ only applies when the question is used in a quiz using adaptive mode – i.e. where the student is allowed multiple attempts at a question even within the same attempt at the quiz. If the penalty factor is more than 0, then the student will lose that proportion of the maximum grade upon each successive attempt. For example, if the default question grade is 10, and the penalty factor is 0.2, then each successive attempt after the first one will incur a penalty of 0.2 x 10 = 2 points.
Each sub-question is equally weighted to contribute towards the grade for the total question. For example, a student who correctly matches 3 of the 4 possible matches will receive 3/4 or 75% of the total possible score for that question.
- Click Save changes to add the question to the category.
Short answer
In a short answer question, the student types in a word or phrase in response to a question (that may include an image). Answers may or may not be case sensitive. The answer could be a word or a phrase, but it must match one of your acceptable answers exactly. It is a good idea to keep the required answer as short as possible to avoid missing a correct answer that is phrased differently.
Question setup
- Select the question category.
- Give your question a descriptive name.
- Create the question text. If you are using the HTML Editor, you can format the question just like a word processing document.
Normally the answer box appears below the question text. However, if you include five or more underscores in the text, the input box will be placed there. For example, the question “Moodle stands for ‘Modular object oriented ___________________ environment”.
- Select an image to display if you want to add a picture to the question. For the student, the image appears immediately after the question text and before the answer options.
- Set the ‘default question grade’ (i.e. the maximum number of marks for this question).
- Set the ‘Penalty factor’. The ‘penalty factor’ only applies when the question is used in a quiz using adaptive mode – i.e. where the student is allowed multiple attempts at a question even within the same attempt at the quiz. If the penalty factor is more than 0, then the student will lose that proportion of the maximum grade upon each successive attempt. For example, if the default question grade is 10, and the penalty factor is 0.2, then each successive attempt after the first one will incur a penalty of 0.2 x 10 = 2 points.
- If you wish, add general feedback. This is text that appears to the student after he/she has answered the question.
- Choose whether the answers are case-sensitive. Case sensitivity can be tricky where capitalization is important. Will you accept Ban Ki-moon as well as ban ki-moon as an answer?
- Next, fill in the answers you will accept. You could give common misspellings partial credit with this option. For example, will you accept “Ban Ki moon”? Use wildcards to allow for variants on a word phrase.
- Add grade for each answer.
- Create feedback for all answers. This will appear if the student enters that answer.
Note: It is good practice to add a single wild card * for the last answer, so you can create a feedback response and a score for all other answers that the students might have.
- Click Save Changes to add the question to the category.
Wildcard usage
You can use the asterisk character (*) as a wildcard to match any series of characters. For example, use ran*ing to match any word or phrase starting with ran and ending with ing. If you really do want to match an asterisk then use a backslash like this: \* If you want one question with the two answers fuel and oxygen, you ought to be able to limit the number of variants by writing fuel*oxygen. This would accept “fuel oxygen”, “fuel, oxygen”, “fuel; oxygen”, “fuel and oxygen”, “fuel & oxygen” “fuel oxygen”, “fuel und oxygen” “fuel&&oxygen”. It would even accept “fuel or oxygen”, “fuel but not oxygen” “fuel|oxygen” which might not be so good, but you can never be completely safe!
Here are some answers and scores for a question “What does a rocket burn?”:
oxygen*fuel with a score 100%
*fuel* with a score 50%
*oxygen* with a score 50%
*air* with a score 40%
* with a score of 0%
The order of the answers is important. The answers are evaluated from 1st to last. When a match is found the process stops. If no match is found the question is scored wrong and the general response is used. It is a good practice to put a wild card as the last answer, so the evaluation process knows what to do when nothing above it matches.
Without wildcards, the answers are compared exactly, so be careful with your spelling.
Numerical
From the student perspective, a numerical question looks just like a short-answer question. The difference is that numerical answers can have an accepted error. This allows a fixed range of answers to be evaluated as one answer.
For example, if the answer is 30 with an accepted error of 5, then any number between 25 and 35 will be accepted as correct.
You can:
- grade independently the number and the unit,
- choose to handle the unit response either as
- a text input element or as
- a multichoice radio element,
- just grade the number with the option to write the unit close to the input element,
- put the unit either
- at right of the number as the most common occurrence
- or at left as in $ 100,00.
Furthermore, your valid number formats and specific instructions on how to answer will be put near the answer input element. An example
Numerical multiple choice unit example:
Questions may have different answers with different levels of accuracy. That lets you create questions like “What is a root of x^2 – 3x + 2?” and award different levels of credit depending on the accuracy of the answer.
Text answers are no longer allowed – Short-Answer question type should be used instead.
Question setup
- Select the question category.
- Give the question a descriptive name – this allows you to identify it in the question bank.
- Enter a question in the ‘question text’ field. This can include an equation by clicking the Equation editor icon from the text editor. The Algebra filter is very good for writing common mathematical expressions in a simple way. More complicated expressions may be written using the TeX filter. Alternatively, select an image to display if you want to add a picture to the question.
- Select an image to display if you want to add a picture to the question. For the student, it appears immediately after the question text and before the choices.
- Set the ‘default question grade’ (i.e. the maximum number of marks for this question).
- Set the ‘Penalty factor’. The ‘penalty factor’ only applies when the question is used in a quiz using adaptive mode – i.e. where the student is allowed multiple attempts at a question even within the same attempt at the quiz. If the penalty factor is more than 0, then the student will lose that proportion of the maximum grade upon each successive attempt. For example, if the default question grade is 10, and the penalty factor is 0.2, then each successive attempt after the first one will incur a penalty of 0.2 x 10 = 2 points.
- Add general feedback. This is text that appears to the student after he/she has answered the question.
- Now enter the first accepted answer(s). Note: Floating point numbers, e.g. 23.4, may also be written as 23,4 or 2.34E+1.
- Enter an accepted error for this answer. This is the range above or below the answer that will be accepted as a match. For example, if the correct answer is 5, but you will accept 4 or 6 as answers, your accepted error is 1.
- Enter a grade for this answer.
- Enter feedback for the accepted answer. This is the text that the student will see if they enter a number within the accepted error of the answer.
- Repeat for each of the answers you want to accept. You can provide feedback for all wrong answers by using a wildcard, i.e. the asterisk character (*), as an answer with grade ‘None’. See Wildcard usage for more information.
- Units can also be specified. For example, if you enter a unit of ‘cm’ here, and the accepted answer is 15, then the answers ’15cm’ and ’15’ are both accepted as correct. You can also specify a multiplier. So, if your main answer was 5500 with unit W, you can also add the unit kW with a multiplier of 0.001. This means that the answers ‘5500’, ‘5500W’ or ‘5.5kW’ would all be marked correct. Note that the accepted error is also multiplied, so an allowed error of 100W would become an error of 0.1kW.
- Click ‘Save changes’ to add the question to the category.
Essay
The essay question type provides the option of answering by uploading one or more files and/or entering text online. (For longer essays, text, or file uploads, you may wish to consider using the Assignment activity rather than this question type.)
Essay questions are created in the same way as other quiz question types. The difference is that essay questions must be marked manually, and the student will not get a final grade until you marked their essay.
Question setup
- Select the question category.
- Give the question a descriptive name – this allows you to identify it in the question bank.
- Create the question text. Select an image to display if you want to add a picture to the question. For the student, it appears immediately after the question text and before the choices.
- Set the ‘default question grade’ (i.e. the maximum number of marks for this question).
- Set the ‘Penalty factor’. The ‘penalty factor’ only applies when the question is used in a quiz using adaptive mode – i.e. where the student is allowed multiple attempts at a question even within the same attempt at the quiz. If the penalty factor is more than 0, then the student will lose that proportion of the maximum grade upon each successive attempt. For example, if the default question grade is 10, and the penalty factor is 0.2, then each successive attempt after the first one will incur a penalty of 0.2 x 10 = 2 points.
- Add general feedback. This is text that appears to the student after he/she has answered the question.
- Set the following request options:
- Response format allows you to choose what is available for the students when typing their essays. No online text means they cannot type any text. You cannot select this if you do not allow attachments, as the students will have nothing to submit. If you have programming students, they may require plain text with monospaced font for their code. You should select ‘HTML editor with file picker’ if you wish to provide the audio and video recording buttons in the HTML editor.
- Require text allows you to decide whether students must add text into the text editor when they do the question. If you only want them to upload a word-processed file as an essay, then you can set this to ‘Text input is optional’. (Note that this setting does not force the student to type text into the text editor; they can still leave it blank and continue to another question.)
- Accepted file types allows you to specify type(s) of file the students must upload.
- You can create a template to scaffold the student’s answer to give them extra support in the Response template area. The template is then reproduced in the text editor when the student starts to answer the question.
- You can also include grading information for marking the essay to refer to as you assess the essays in the Grader Information area.
- Click ‘Save changes’ to add the question to the category.
Calculated
The main purpose of the calculated question is to create multiple versions of a question with different numerical values. This means you must have at least one wildcard in one of the answers.
If you do not need a random element, use the Numerical question type instead. Also, the simple calculated question offers the most used features of the calculated question with a much simpler creation interface.
Calculated questions offer a way to create individual numerical questions by the use of wildcards (i.e. you can use common variables names as x , y enclosed in curly braces to create the wildcards {x} and {y}) that are substituted with random values when the quiz is taken.
For example, if you want to create a large number of “Calculate the area of a rectangle” problems to drill your students, you could create a question with two wildcards (i.e. {base}, {height} created from the common base, height variable names) and put in the “Correct Answer Formula =” input field {base} * {height} ( * being the multiplication sign ).
Correct Answer Formula = {base} * {height}
When a student takes the test, the system will randomly select values for {base} and {height} and grade the response using the result of the Correct Answer Formula.
Question setup
- Select the question category.
- Any shared wildcards for this category are listed beneath. If you change category, you will need to click the “Update the category” button to refresh this list. There may not be any shared wildcards yet – if not, you can create them later if you wish.
- Give the question a descriptive name – this allows you to identify it in the question bank.
- Enter the question text. This should be the question you want the student to answer, and it must include all the information they need to calculate an answer. Therefore, it must contain at least one wildcard, inside curly braces. For example, if you wanted the student to sum numbers A and B, the question text might read: “What is {A} + {B}?” You may also include quantities computed from wildcards using the syntax “{=…}: for example, the question “What is {={A}+{B}} – {A}?” with wildcard values A=4 and B=3 would display as “What is 7 – 4?”
- Select an image to display if you want to add a picture to the question. For the student, it appears immediately after the question text and before the choices. If you want more control over how the image appears, include it in the question text above, using the HTML editor.
- Set the default question grade (i.e. the maximum number of marks for this question).
- Set the Penalty factor. The ‘penalty factor’ only applies when the question is used in a quiz using adaptive mode – i.e. where the student is allowed multiple attempts at a question even within the same attempt at the quiz. If the penalty factor is more than 0, then the student will lose that proportion of the maximum grade upon each successive attempt. For example, if the default question grade is 10, and the penalty factor is 0.2, then each successive attempt after the first one will incur a penalty of 0.2 x 10 = 2 points.
- If you wish, add general feedback. This is text that appears to the student after he/she has answered the question.
- Next, add the formula for the answer. This formula must contain at least the wildcards that appear in the question text. See Correct answer formula syntax for further details.
- Choose the grade that the student will get for this question if they give this answer. This should be a percentage of the total marks available. For example, you could give 100% for a correct answer, and 50% for an answer that is nearly right. One of the answers must have a 100% grade.
- Determine the tolerance for error that you will accept in the answer. The tolerance and tolerance type settings combine to give a range of acceptable scores. So, if tolerance = t, correct answer = x and the difference between the user’s answer and the correct answer is dx, then the tolerance types are as follows:
- Nominal – mark correct if |dx| <= t
- Relative – mark correct if |dx| / x <= t
- Geometric – mark correct if x/(1+t) <= (x+dx) <= x*(1+t)
- The next 2 settings, “Correct answer shows” and “Format” determine the precision of the answer. Use these to select the number of decimal places or significant figures you want to use.
- Add some feedback which the student will see if they enter this answer.
- You can specify as many answer formulae as you like – click “Add another answer blank” to add more.
- You can also specify units for the answers. For example, if you enter a unit of ‘cm’ here, and the accepted answer is 15, then the answers ’15cm’ and ’15’ are both accepted as correct. If you add more than one unit, you can also specify a multiplier. So, if your main answer was 5500 with unit W, you can also add the unit kW with a multiplier of 0.001. This means that the answers ‘5500’, ‘5500W’ or ‘5.5kW’ would all be marked correct. Note that the accepted error is also multiplied, so an allowed error of 100W would become an error of 0.1kW.
- Click “Save changes” to save what you have done and move on. The Choose wildcards dataset properties screen will open.
- Each wildcard that you specify in the answer formula must have an associated set of possible values – this is its dataset. Each of the wild cards is listed on this page along with a choice of dataset: For each wild card, choose will use a new shared dataset.
- Private: only used by this question
- Shared: shared with other calculated questions in the same category
Note: Using a shared dataset can save time when you are creating a lot of similar calculated questions.
To synchronize the wild card values with the other questions in the quiz, choose Synchronize, then click Next page. The Edit the wildcards datasets screen will open.
Edit the Datasets
There are two ways of creating values – you can type them in yourself and add them to the list, or you can have Moodle generate random values. The table at the top of the page will keep an updating count of how many wild cards have been added to the set.
Adding individual values to the list:
- In the Item to add section, choose the value you want for each wild card item. You can ignore the Range of values since the values will not be random.
- Scroll down to the Add section and click Add (leaving the number of items set to 1)
- Repeat the above steps as many times as necessary (the maximum number of items is 100)
To delete values from the list:
- In the Delete section, select the number of items to delete
- Click Delete.
Let the system generate values
- In the Item to add section choose values for the Range of Values fields and enter the lower and upper limits for the values you would accept.
- Enter the number of decimal places for the value.
- Choose the Distribution of values between the limits
- Uniform means any value between the limits is equally likely to be generated.
- Loguniform means that values towards the lower limit are more likely.
- Now move down to the Add section and choose Force regeneration of all wildcards.
- Next to Add, choose the number of sets of random values (items) you wish to add to the list. (Note that the maximum total number of items in your list is 100.)
- Finally, click Add to append the new values to the dataset. The screen will reload, and you will see a preview of the wild card values that have been added to your dataset.
Note: If you want more control over the items that Moodle adds, you can do them one at a time and preview the values before you add them. Click Get New Item to Add to make Moodle generate new values in the Item to Add section at the top. If you like them, click Add for 1 item; if not, click Get New Item to Add again to get new values.
- Once you have added wild card values to the question dataset, you can finish creating the question. Click Save changes to save the question.
Correct answer formula syntax
- Do not put the = sign in the formula.
- You could have more than one answer formula and apply a specific grading value to each of them if there is at least one 100% correct answer formula.
- Generally, write these formulas like you would in a calculator e.g. 3 + 5 * sin(3/{x})
A notable exception is exponentiation, where x3 cannot be entered as {x}^3, but instead should be entered as pow({x}, 3). See Available Functions to view all available arithmetic operators.
- Each function’s placeholders and other arguments should be in parentheses (brackets). For example, if you want students to calculate the sine of one angle and cosine of two times another angle, you would enter sin({a}) + cos({b}*2) or sin({a}) + cos(2*{b}).
- It is usually better to have too many parentheses (brackets) than too few. The server will not care, and the more specific you are about what you mean, the more likely it will like your complex formulas.
- There is no implicit multiplication. Always use the “*” for multiplication.
- Any special mathematical function must have parentheses around its values. Take the sine function in the first bullet point for instance. Notice that the 3 / x is wrapped in parentheses (brackets)–this is so the server can understand it properly. Without those parentheses, the server will not know if you mean “(sin 3) / x” or “sin (3 / x)” and will reject the entire formula accordingly.
Drag and drop into text
A drag and drop question type where missing words must be dragged into gaps in a paragraph of text.
Select the Select missing words question type. It uses drop-down menus in the text instead of drag-boxes. It works well where the question text is very long, and you would have to scroll a lot to do drag and drop.
Question setup
- Select the question category.
- Give the question a descriptive name – this allows you to identify it in the question bank.
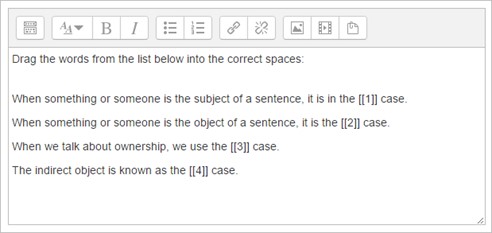
- Add the question to the text editor, using any formatting you wish. Use double square brackets ‘[[n]]’ with a number in place of the word you wish the students to find. An example is shown below.
Select an image to display if you want to add a picture to the question. For the student, it appears immediately after the question text and before the choices.
- Set the ‘default question grade’ (i.e. the maximum number of marks for this question).
- Set the ‘Penalty factor’. The ‘penalty factor’ only applies when the question is used in a quiz using adaptive mode – i.e. where the student is allowed multiple attempts at a question even within the same attempt at the quiz. If the penalty factor is more than 0, then the student will lose that proportion of the maximum grade upon each successive attempt. For example, if the default question grade is 10, and the penalty factor is 0.2, then each successive attempt after the first one will incur a penalty of 0.2 x 10 = 2 points.
- Add general feedback. This is text that appears to the student after he/she has answered the question.
- In the Choices area, add the missing words or phrases in the correctly numbered boxes in the ‘Choice’ section. (You may add extra ones to make the question harder.) If you tick ‘Shuffle’ the display order will be shuffled:
Choices that are within the same Group are color coded and may only be dropped in a gap with the corresponding color. Choices that are marked as ‘Unlimited may be used in multiple locations.
- Enter feedback for the responses. This is the text that the student will see if they enter a number within the accepted error of the answer.
- Click ‘Save changes’ to add the question to the category.
Description
A Description question page simply shows some text (and possibly graphics) without requiring an answer. It is more of a label than a question type.
When shuffling questions is turned off, this type of page can provide information to be used by a following group of questions.