Home > User Guides > VLE Guide for Instructors > Adding Instruction Modules >  Adding Resources to Your Course

Adding Resources to Your Course

Composing a page

The page resource is a simple page you can use for instructions or some basic information. This creates a link to a screen that displays the content that you created. The Text editor allows the page to display many different kinds of content such as plain text, images, audio, video, web links, embedded code or a combination of all these. For large amounts of content, it is recommended that a book is used rather than a page.

To set up a page, follow these steps:

1.  Click the Turn Editing On button in the top-right corner of your course main page.

2.  Go to the section or week or topic to which you want to add the page.

3.  Press the Add an activity or resource button, select the Resources tab, and select Page. This will take you to an Adding a New Page window, shown below.


Adding a new page window

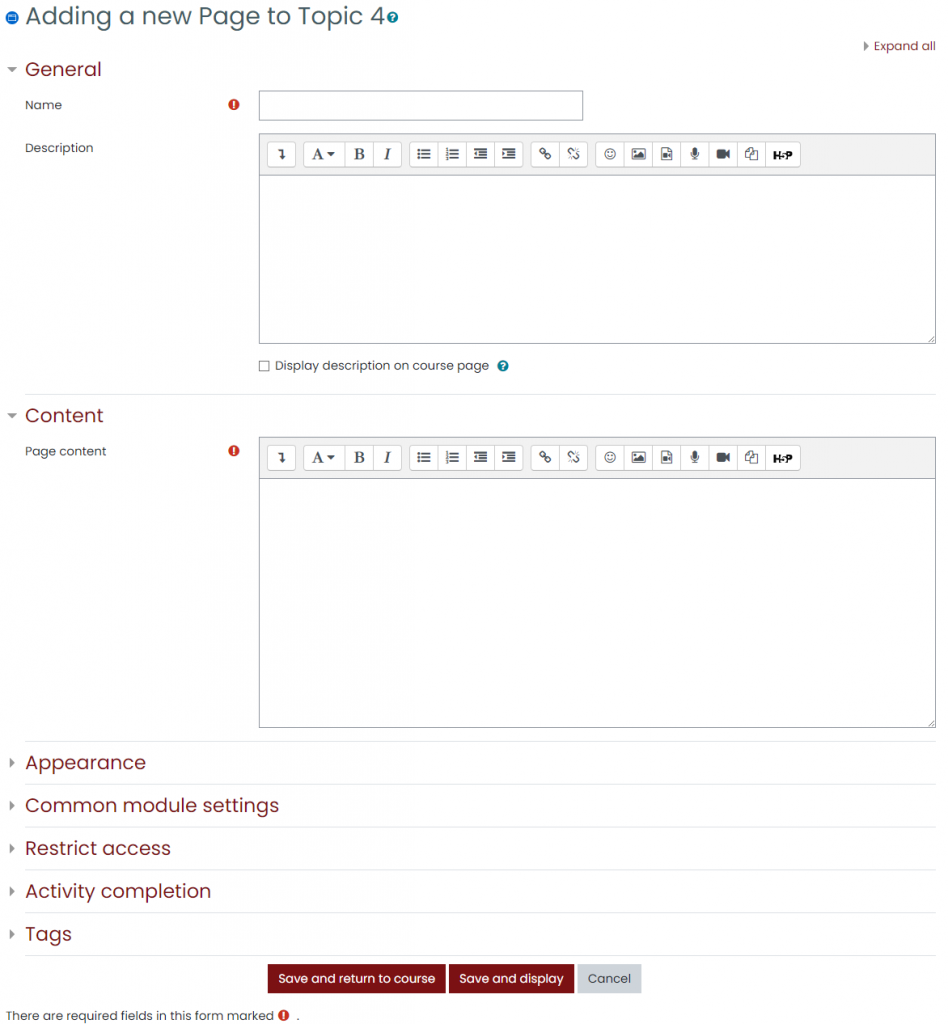
4.  Enter a name for the page. Anything marked with exclamation  icon is a required field. (Optional) Write a page description. You have the option to display it in the course main page by ticking off the box beside Display description on course page.

5.  Add content for your page in the text box provided. You can use various styles and graphics, embed YouTube videos, and/ or link to resources. You can make it as creative as you need.

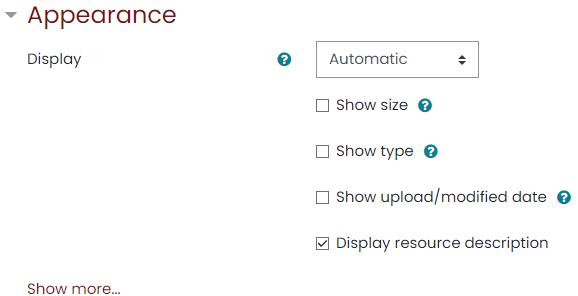
6.  From the Appearance area, you have an option to show or hide portions of your page. Check the box to display and uncheck to hide the specified segment.

Page: Appearance settings

7.  Choose the ‘Common module’, ‘Restrict access’, ‘Activity Completion’, and ‘Tags’ settings as you would when you set up any resource or activity. These general settings are further discussed in Activities and Resources: General Settings.

8.  Click the Save and return to course button to return to the course main page. You will see the link to the page, with the page icon in front of it. Clicking on the title will take you to the page. As an alternative to clicking the Save and return to course button, you can preview what the page looks like by clicking the Save and display button.

Creating a book of pages

The book resource is a multi-page resource in a book-like format, with chapters and subchapters. Books can contain media files as well as text and are useful for displaying lengthy passages of information which can be broken down into sections.

A book may be used to display reading material for individual modules of study, to serve as a staff departmental handbook or as a showcase portfolio of student work.

To set up a book, follow these steps:

1.  Click the Turn Editing On button in the top-right corner of your course main page.

2.  Go to the section or week or topic to which you want to add the book.

3.  Press the Add an activity or resource button, select the Resources tab, and select Book. This will take you to an Adding a New Book window, shown below.

Adding a New Book page

4.  Enter the name of the book. Anything marked with exclamation  icon is a required field. (Optional) Write a book You have the option to display it in the course main page by ticking off the box beside Display description on course page.

5.  In the Appearance area, you can customize the chapter format and the style of navigation.

The options for chapter formatting are:

      • None – Chapter and subchapter titles are not formatted at all, use if you want to define special numbering styles. For example letters: in chapter title type “A First Chapter”, “A.1 Some Subchapter”,…
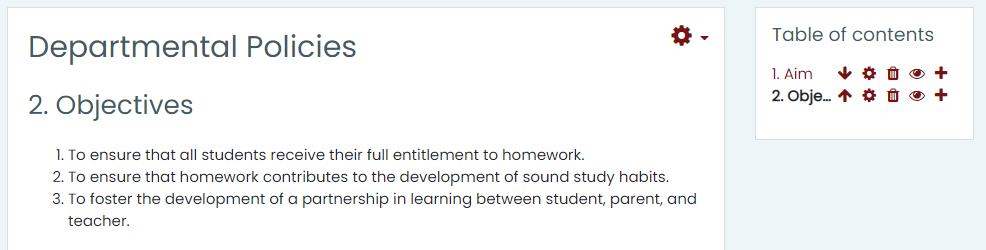
      • Numbers – Chapter and subchapter titles are numbered. (1, 1.1, 1.2, 2, …)
      • Bullets – Subchapters are indented and displayed with bullets in the table of contents.
      • Indented – Subchapters are indented in the table of contents.

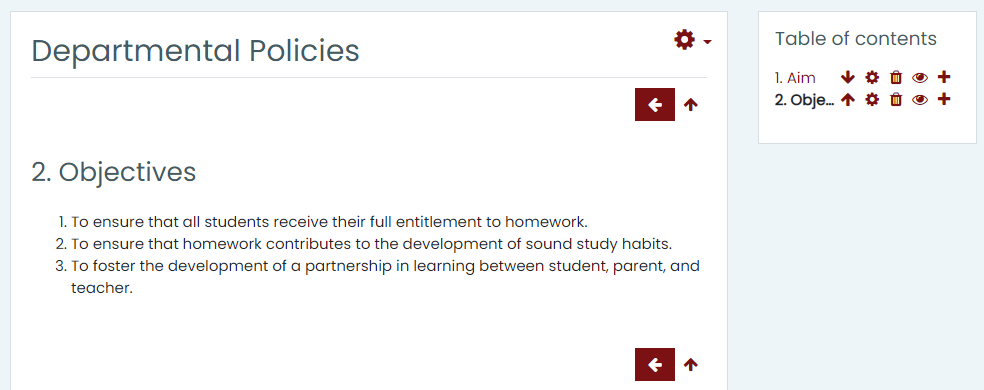
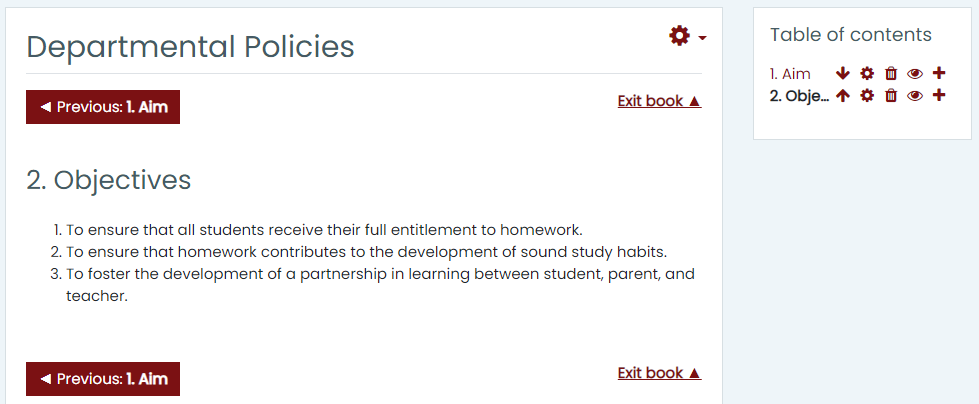
The options for style of navigation are:

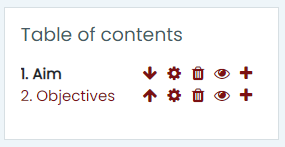
      • TOC only – The table of contents will only be displayed and there are no icons for navigation. If you choose this option, the appearance of the book window will be similar to the image below.
Book Navigation Style: TOC only
      • Images – Icons are used for navigation. If you choose this option, the appearance of the book window will be similar to the image below.
Book Navigation Style: Images
      • Text – Chapter titles are used for navigation. If you choose this option, the appearance of the book window will be similar to the image below.
Book Navigation Style: Text

6.  Choose the ‘Common module’, ‘Restrict access’, ‘Activity Completion’, and ‘Tags’ settings as you would when you set up any resource or activity. These general settings are further discussed in Activities and Resources: General Settings.

7.  Click the Save and return to course button to return to the course main page. You will see the link to the book, with the book icon in front of it. Clicking on the title will take you to the book page. As an alternative to clicking the Save and return to course button, you can preview what the book looks like by clicking the Save and display button.

Adding chapters and subchapters

Titles of chapters appear as links in the table of contents to the right of your content. It is recommended to keep your titles short.

To add a chapter:

1.  If you clicked the Save and display button right after creating a new book, skip to step 3. It will take you to Add a new chapter window. Otherwise, if you clicked the Save and return to course button, click the Turn Editing On button in the top-right corner of your course main page.

Select the book where you will add chapters and subchapters. This will take you to Add a new chapter window.

Add a new chapter window (without existing chapters))

2.  Click on the + icon of any chapter in the Table of Contents as shown in below.

Book: Table of Contents

The new chapter will be inserted directly after the chapter whose title is on the same line as the icon you clicked. The Add a new chapter window will be similar to the image below.

Add a new chapter window (with existing chapters)

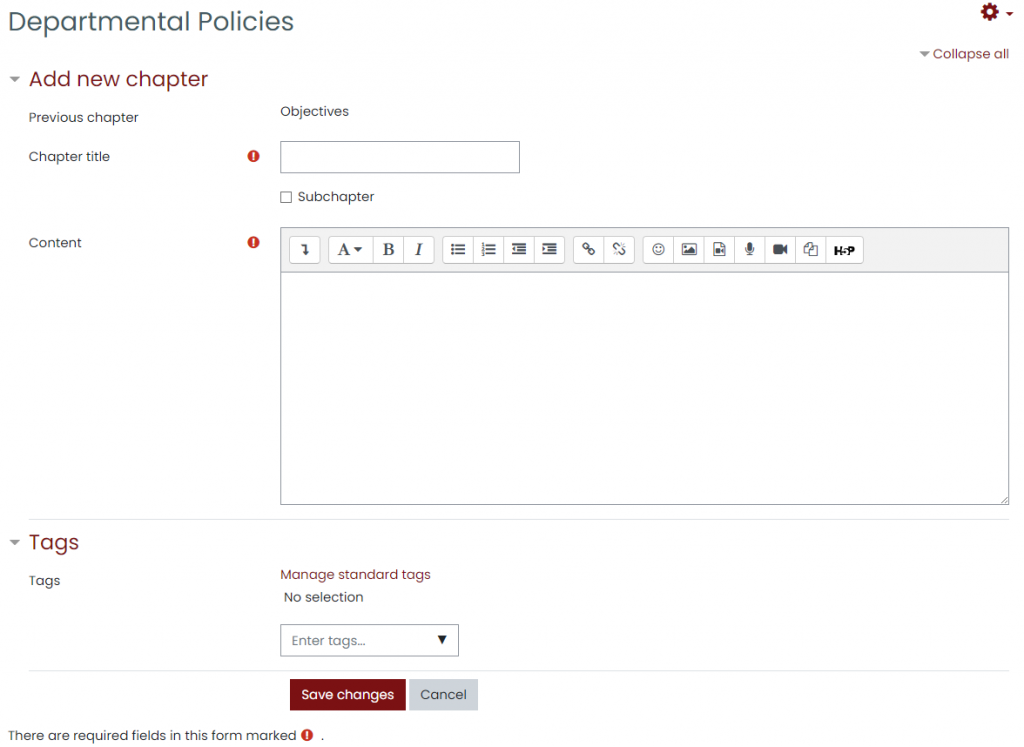
3.  Enter the title and content of the chapter. Anything marked with exclamation icon is a required field.
A chapter may have many subchapters, but subchapters cannot have further subchapters. To keep this resource simple, you are limited to two levels. Tick off the box beside Subchapter to create a subchapter.

4.  Click the Save changes button.

Linking to a file or a website

The URL resource is a module that provides a web link as a course resource. Anything that is freely available online, such as documents or images, can be linked to; the URL does not have to be the home page of a website. You can use the URL resource to provide your students with web links for research, saving the student time and effort in manually typing out the address.  The URL of a particular web page may be copied and pasted or you can use the file picker and choose a link from a repository such as Flickr, YouTube or Wikimedia (depending upon which repositories are enabled for the site).

There are several display options for the URL, such as embedded or opening in a new window and advanced options for passing information, such as a student’s name, to the URL if required.

Note that URLs can also be added to any other resource or activity type through the text editor.

To set up a URL, follow these steps:

1.  Click the Turn Editing On button in the top-right corner of your course main page.

2.  Go to the section or week or topic to which you want to add the URL.

3.  Press the Add an activity or resource button, select the Resources tab, and select URL. This will take you to an Adding a New URL window, shown below.


Adding a new URL window

4.  Give your URL a name and type (or copy/paste) the URL into the External URL box. Anything marked with exclamation icon is a required field. If you need to search for the correct URL, click the Choose a link button. When you find and select your link, it will be automatically pasted into the box
(Optional) Give the URL a description if you wish and tick the box to display that description on the course main page if needed.

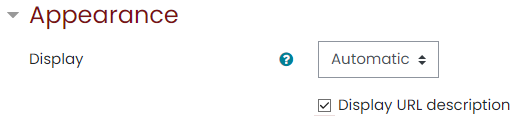
5.  In the Appearance area, you can customize how the file will be displayed.

The options for the display settings:

    • Automatic – The best display option for the URL is selected.
    • Embed – The URL is displayed within the page below the navigation bar together with the URL description and any blocks.
    • Open – Only the URL is displayed in the browser window
    • In pop-up – The URL is displayed in a new browser window without menus or an address bar.
    • In frame – The URL is displayed within a frame below the navigation bar and URL description.
    • New window – The URL is displayed in a new browser window with menus and an address bar.
URL: Appearance settings

6.) The URL variables area allows you to pass internal information as part of the URL. This is useful if the URL is an interactive web page that takes parameters, and you want to pass something like the name of the current user, for example.

Another use is to create stable links that updates in each iteration of the course, for example: if you want to link to the student’s user report, then you add the base URL to the External URL field, and then in the URL variables section, add ‘id’ to the first field and select ‘id’ from under the site heading, and then save changes. The result is a URL that always points to the student’s user report.

A further use includes displaying all forums in a site, by using the base URL then adding add ‘id’ to the first field and selecting ‘id’ from under the site heading. Another use makes use of mailto:email@address. URL variables could then include the subject parameter followed by the ‘Site full name’. E.g. if you wanted to email a teacher who taught multiple courses, if a student clicked the URL then the email would automatically fill the subject field, which would help the teacher to identify which course the student was in.

URL: URL variables settings

7.  Choose the ‘Common module’, ‘Restrict access’, ‘Activity Completion’, and ‘Tags’ settings as you would when you set up any resource or activity. These general settings are further discussed in Activities and Resources: General Settings.

8.  Click the Save and return to course button to return to the course main page. You will see the link to the URL, with the URL icon in front of it. Clicking on the title will take you to the URL window. As an alternative to clicking the Save and return to course button, you can preview what the URL looks like by clicking the Save and display button.

Adding a file

The file module enables a teacher to provide a file as a course resource. Where possible, the file will be displayed within the course interface; otherwise students will be prompted to download it. The file may include supporting files, for example an HTML page may have embedded images.

Note that students need to have the appropriate software on their computers to open the file.

A file may be used to share presentations given in class, to include a mini website as a course resource, or to provide draft files of software programs so students can edit and submit them for assessment.

You can add a file in the course main page when editing is turned on by dragging and dropping it or by clicking an Add an activity or resource link and selecting File.

Dragging and Dropping files

If you are using a modern browser, you can simply click, hold and drag and drop a file directly onto your course main page.

Uploading files

1.  Click the Turn Editing On button in the top-right corner of your course main page.

2.  Go to the section or week or topic to which you want to add the page.

3.  Press the Add an activity or resource button, select the Resources tab, and select File. This will take you to an Adding a New File window, shown below.

Add a new file window

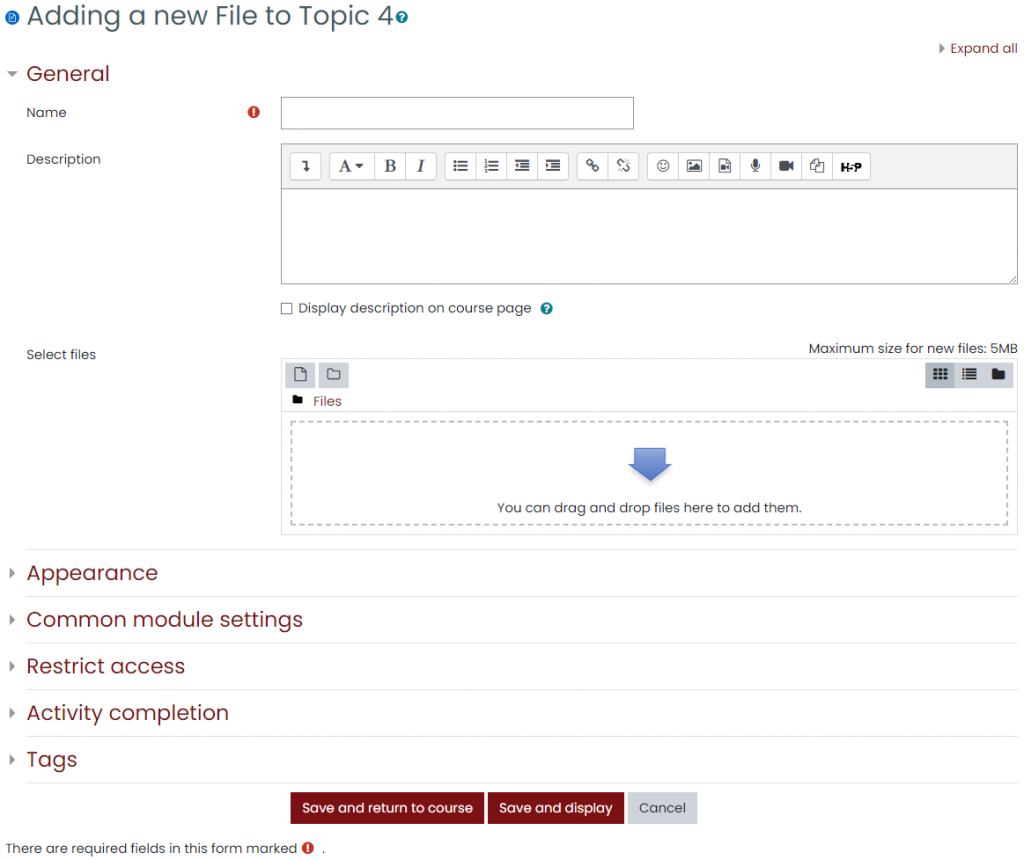
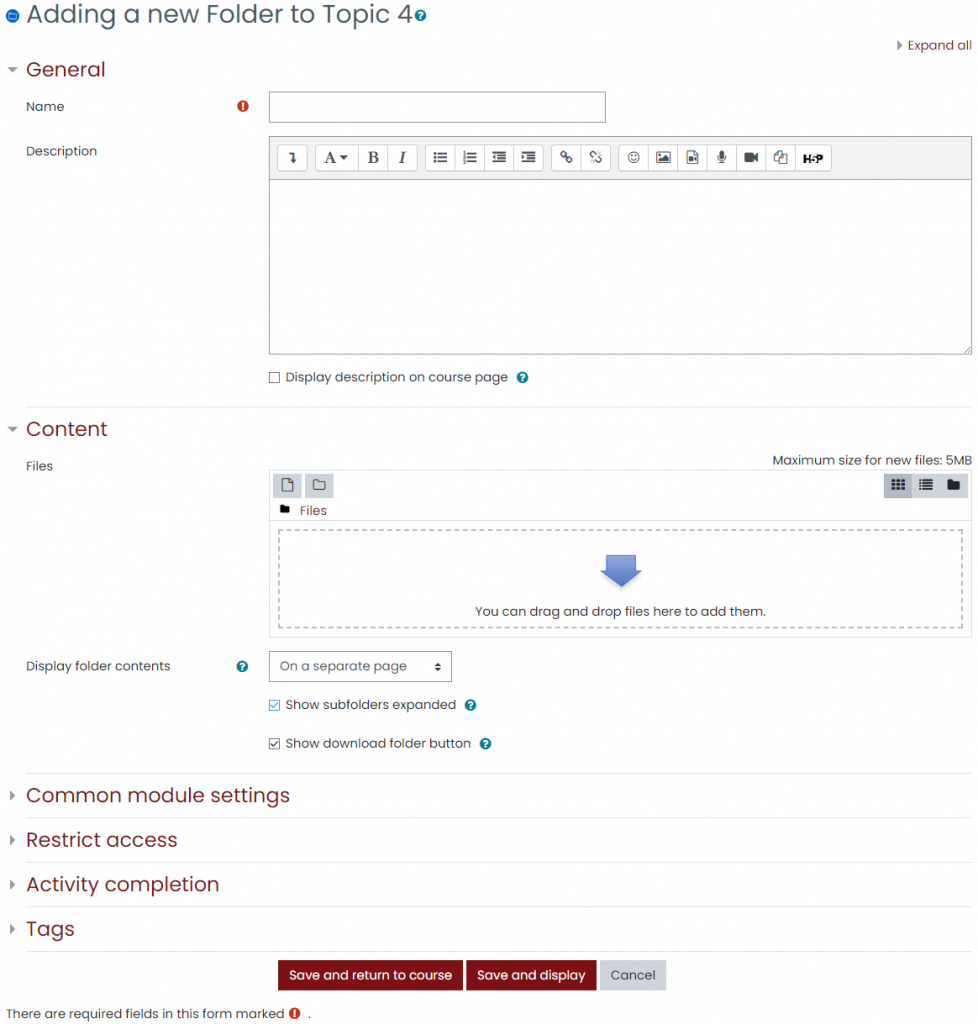
4. Enter the name of the file. Anything marked with exclamation icon is a required field. (Optional) Write a file description. You have the option to display it in the course main page by ticking off the box beside Display description on course page.

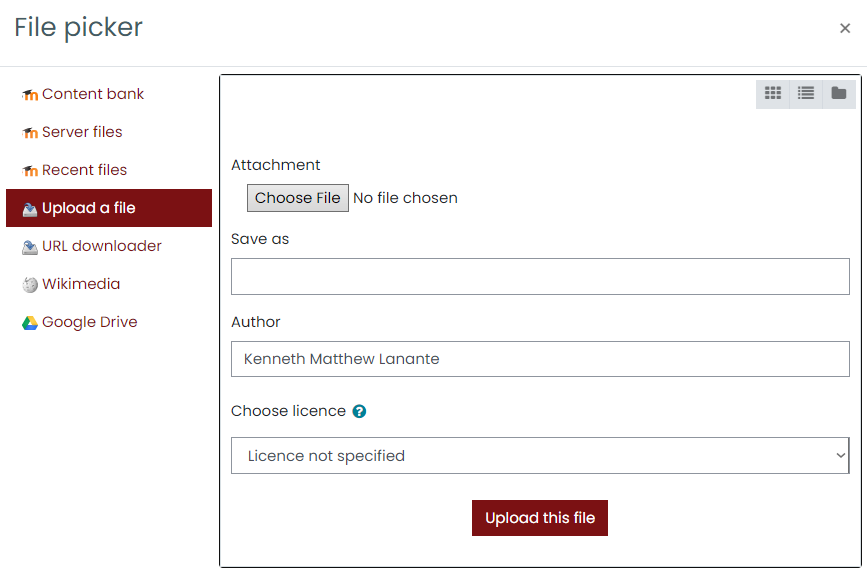
5.  In the Select files area, you can create a folder first before uploading the file by clicking the folder button to. Click the file button to add a file or drag and drop a file. There is a block (with an arrow) into which you can drag and drop a file straight from your local files into the site. If you clicked the file  button, a File Picker window will appear.

File Picker

When the file picker screen appears, a number of links are listed down the side. These are links to Repositories which hold files you might want to use. There is also a link Upload a file which you would click on to add a file yourself from your computer.

If you want to upload files from your computer, click Choose File and select the file to be added. You may supply a new file name under the Save as field. The uploaded file will retain its file name from the computer if you don’t fill in the Save as field.

6.  In the Appearance area, you can customize how the file will be displayed.

The options for the display settings:

    • Automatic – The best display option for the file type is selected.
    • Embed – The file is displayed within the page below the navigation bar together with the file description and any blocks.
    • Force download – The user is prompted to download the file.
    • Open – Only the file is displayed in the browser window
    • In pop-up – The file is displayed in a new browser window without menus or an address bar.
    • In frame – The file is displayed within a frame below the navigation bar and file description.
    • New window – The file is displayed in a new browser window with menus and an address bar.

All the above is true of items that can be displayed inside the browser directly (e.g. images, text files, PDFs (with plugin)). If the file cannot be displayed within the browser (e.g. word documents, without a suitable plugin, or other files that need to be loaded by an external program), then the pop-ups or frames, etc. will be created, but then the browser will take over and ask if you want to save the file.

To show the file size and/or type on the course page and also on the resource page, simply tick the appropriate checkboxes. Also, if Show upload/modified date is enabled, this setting will display the date the resource was uploaded. If several resources are uploaded, then the date of the main file that was uploaded will be displayed.

Click the Show more… link to modify additional settings.

File: Appearance settings

7.  Choose the ‘Common module’, ‘Restrict access’, ‘Activity Completion’, and ‘Tags’ settings as you would when you set up any resource or activity. These general settings are further discussed in Activities and Resources: General Settings.

8.  Click the Save and return to course button to return to the course main page. You will see the link to the file, with the file icon in front of it. Clicking on the title will take you to the file window. As an alternative to clicking the Save and return to course button, you can preview what the file looks like by clicking the Save and display button.

Adding a folder

If you need your students to access many files that you have uploaded, displaying directory, depicted as a folder, that contains all the files on the course main page is simpler and easier for your students. You can structure folders by unit, theme, or types of files, such as links to resources or lecture notes. Your students can open the folders and subfolders and open the files they need from there instead of scrolling through many different files.

To set up a directory, you first need to create the folder that will hold your files. If you put it in the root directory (default directory), students will be able to access all files, which you may not want. To create a folder, follow these steps:

1.  Click the Turn Editing On button in the top-right corner of your course main page.

2.  Go to the section or week or topic to which you want to add the folder.

3.  Press the Add an activity or resource button, select the Resources tab, and select Folder. This will take you to an Adding a New Folder window, shown below.

Add a new folder window

4.  Fill in the Name field for the new directory, which is required. (Optional) Add a description. The description is useful to students because they see it on the Resources outline page.

5.  Select the directory you want to display on your course main page.

6.  You can change how the folder contents will be displayed. Select On a separate page or Inline on a course page from the dropdown list.

7.  To show expanded folders and/or download button on the course page and also on the resource page, simply tick the appropriate checkboxes.

8.  Choose the ‘Common module’, ‘Restrict access’, ‘Activity Completion’, and ‘Tags’ settings as you would when you set up any resource or activity. These general settings are further discussed in Activities and Resources: General Settings.

9.  Click the Save and return to course button to return to the course main page. You will see the link to the file, with the file icon in front of it. Clicking on the title will take you to the file window. As an alternative to clicking the Save and return to course button, you can preview what the file looks like by clicking the Save and display button.