Home > User Guides > VLE Guide for Instructors > Virtual Learning Environment Basics > Activities and Resources
Activities and Resources
Overview
Resources allow you to add content to the course, and activities are collaborative and/or interactive modules you add to the course. Both make up the bulk of your online learning environment. You can add these modules when editing is turned on.
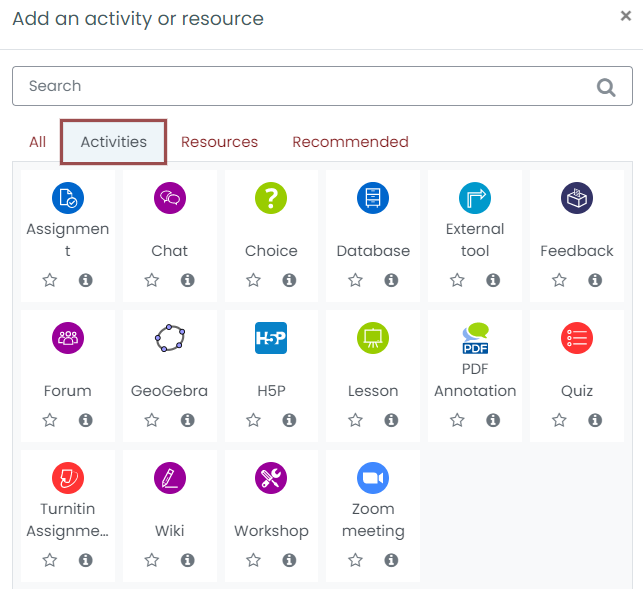
- Activities: An activity requires a student input to develop independent and active student learning. There are various types of activities available: assignments, quizzes, polls and surveys, and formats for providing interactive content. The image below shows the list of activities you can add to your course. Just click the activity that you want to add.
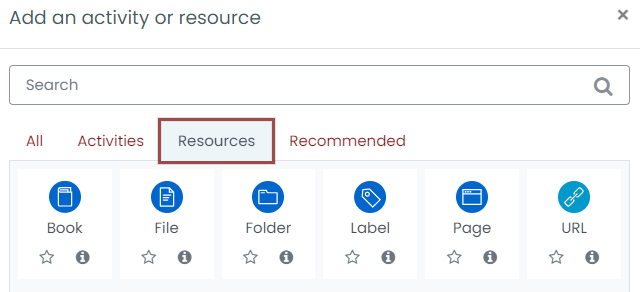
- Resources: A resource refers to the content that you can create within your course, link to the Internet, or upload files such as PDFs, Word documents, spreadsheets, PowerPoint files, video, and sound. The image below shows the resources you can add to your course when you click Add an activity or resource.
Types of Activities
Activities for Communication and Collaboration
The chat activity module enables participants to have text-based, real-time synchronous discussions.
The chat may be a one-time activity, or it may be repeated at the same time each day or each week. Chat sessions are saved and can be made available for everyone to view or restricted to users with the capability to view chat session logs.
Chats are especially useful when the group chatting is not able to meet face-to-face, such as
Regular meetings of students participating in online courses to enable them to share experiences with others in the same course but in a different location
A student temporarily unable to attend in person chatting with their teacher to catch up with work
Students out on work experience getting together to discuss their experiences with each other and their teacher
Younger children using chat at home in the evenings as a controlled (monitored) introduction to the world of social networking
A question and answer session with an invited speaker in a different location
Sessions to help students prepare for tests where the teacher, or other students, would pose sample questions
The database activity module enables participants to create, maintain and search a collection of entries (i.e. records). The structure of the entries is defined by the teacher as several fields. Field types include checkbox, radio buttons, drop-down menu, text area, URL, picture, and uploaded file.
The visual layout of information when listing, viewing, or editing database entries may be controlled by database templates. Database activities may be shared between courses as presets and a teacher may also import and export database entries.
If the database auto-linking filter is enabled, any entries in a database will be automatically linked where the words or phrases appear within the course.
A teacher can allow comments on entries. Entries can also be rated by teachers or students (peer evaluation). Ratings can be aggregated to form a final grade which is recorded in the gradebook.
Database activities have many uses, such as
A collaborative collection of web links, books, book reviews, journal references etc.
For displaying student-created photos, posters, websites or poems for peer comment and review.
The feedback activity module enables a teacher to create a custom survey for collecting feedback from participants using a variety of question types including multiple choice, yes/no or text input.
Feedback responses may be anonymous if desired, and results may be shown to all participants or restricted to teachers only. Any feedback activities on the site front page may also be completed by non-logged-in users.
Feedback activities may be used
For course evaluations, helping improve the content for later participants
To enable participants to sign up for course modules, events etc.
For guest surveys of course choices, school policies etc.
For anti-bullying surveys in which students can report incidents anonymously
The forum activity module enables participants to have asynchronous discussions i.e. discussions that take place over an extended period.
There are several forum types to choose from, such as a standard forum where anyone can start a new discussion at any time; a forum where each student can post exactly one discussion; or a question and answer forum where students must first post before being able to view other students’ posts. A teacher can allow files to be attached to forum posts. Attached images are displayed in the forum post.
Participants can subscribe to a forum to receive notifications of new forum posts. A teacher can set the subscription mode to optional, forced or auto, or prevent subscription completely. If required, students can be blocked from posting more than a given number of posts in each time; this can prevent individuals from dominating discussions.
Forum posts can be rated by teachers or students (peer evaluation). Ratings can be aggregated to form a final grade which is recorded in the gradebook.
Forums have many uses, such as
A social space for students to get to know each other
For course announcements (using a news forum with forced subscription)
For discussing course content or reading materials
For continuing online an issue raised previously in a face-to-face session
For teacher-only discussions (using a hidden forum)
A help center where tutors and students can give advice
A one-on-one support area for private student-teacher communications (using a forum with separate groups and with one student per group)
For extension activities, for example ‘brain teasers’ for students to ponder and suggest solutions to
The glossary activity module enables participants to create and maintain a list of definitions, like a dictionary, or to collect and organize resources or information.
A teacher can allow files to be attached to glossary entries. Attached images are displayed in the entry. Entries can be searched or browsed alphabetically or by category, date, or author. Entries can be approved by default or require approval by a teacher before they are viewable by everyone.
If the glossary auto-linking filter is enabled, entries will be automatically linked where the concept words and/or phrases appear within the course.
A teacher can allow comments on entries. Entries can also be rated by teachers or students (peer evaluation). Ratings can be aggregated to form a final grade which is recorded in the gradebook.
Glossaries have many uses, such as
A collaborative bank of key terms
A ‘getting to know you’ space where new students add their name and personal details
A ‘handy tips’ resource of best practice in a practical subject
A sharing area of useful videos, images, or sound files
A revision resource of facts to remember
The wiki activity module enables participants to add and edit a collection of web pages. A wiki can be collaborative, with everyone being able to edit it, or individual, where everyone has their own wiki which only, they can edit.
A history of previous versions of each page in the wiki is kept, listing the edits made by each participant.
Wikis have many uses, such as
For group lecture notes or study guides
For members of a faculty to plan a scheme of work or meeting agenda together
For students to collaboratively author an online book, creating content on a topic set by their tutor
For collaborative storytelling or poetry creation, where each participant writes a line or verse
As a personal journal for examination notes or revision (using an individual wiki)
The workshop activity module enables the collection, review, and peer assessment of students’ work.
Students can submit any digital content (files), such as word-processed documents or spreadsheets and can also type text directly into a field using the text editor.
Submissions are assessed using a multi-criteria assessment form defined by the teacher. The process of peer assessment and understanding the assessment form can be practiced in advance with example submissions provided by the teacher, together with a reference assessment. Students are given the opportunity to assess one or more of their peers’ submissions. Submissions and reviewers may be anonymous if required.
Students obtain two grades in a workshop activity – a grade for their submission and a grade for their assessment of their peers’ submissions. Both grades are recorded in the gradebook.
Activities for Assessments and Surveys
The assignment activity provides a space into which students can submit work for teachers to grade and give feedback on. This saves on paper and is more efficient than email. It can also be used to remind students of ‘real-world’ assignments they need to complete offline, such as artwork, and thus not require any digital content.
Student submissions are together on one screen of your course. You can require them to submit one or several files and/or to type text essays. It is possible to have them submit work as a group and you can also choose as a teacher to grade their work ‘blind’ in other words not to see the identities of those who have submitted assignments. Assignments can have deadlines and cut off dates – which you can also extend if necessary.
The quiz activity enables a teacher to create quizzes comprising questions of various types, including multiple choice, matching, short-answer and numerical.
The teacher can allow the quiz to be attempted multiple times, with the questions shuffled or randomly selected from the question bank. A time limit may be set.
Each attempt is marked automatically, except for essay questions, and the grade is recorded in the gradebook.
The teacher can choose when and if hints, feedback, and correct answers are shown to students.
Quizzes may be used
As course exams
As mini tests for reading assignments or at the end of a topic
As exam practice using questions from past exams
To deliver immediate feedback about performance
For self-assessment
The choice activity module enables a teacher to ask a single question and offer a selection of possible responses.
Choice results may be published after students have answered, after a certain date, or not at all. Results may be published with student names or anonymously.
A choice activity may be used
As a quick poll to stimulate thinking about a topic
To quickly test students’ understanding
To facilitate student decision-making, for example allowing students to vote on a direction for the course
The survey activity module provides several verified survey instruments that have been found useful in assessing and stimulating learning in online environments. A teacher can use these to gather data from their students that will help them learn about their class and reflect on their own teaching.
Note that these survey tools are pre-populated with questions. Teachers who wish to create their own survey should use the feedback activity module.
Interactive Delivery of Content
The lesson activity module enables a teacher to deliver content and/or practice activities in interesting and flexible ways. A teacher can use the lesson to create a linear set of content pages or instructional activities that offer a variety of paths or options for the learner. In either case, teachers can choose to increase engagement and ensure understanding by including a variety of questions, such as multiple choice, matching and short answer. Depending on the student’s choice of answer and how the teacher develops the lesson, students may progress to the next page, be taken back to a previous page or redirected down a different path entirely.
A lesson may be graded, with the grade recorded in the gradebook.
Lessons may be used
For self-directed learning of a new topic
For scenarios or simulations/decision-making exercises
For differentiated revision, with different sets of revision questions depending upon answers given to initial questions
The external tool activity module enables students to interact with learning resources and activities on other web sites. For example, an external tool could provide access to a new activity type or learning materials from a publisher.
To create an external tool activity, a tool provider which supports LTI (Learning Tools Interoperability) is required. A teacher can create an external tool activity or make use of a tool configured by the site administrator.
External tool activities differ from URL resources in a few ways:
External tools are context aware i.e. they have access to information about the user who launched the tool, such as institution, course, and name
External tools support reading, updating, and deleting grades associated with the activity instance
External tool configurations create a trust relationship between your site and the tool provider, allowing secure communication between them
H5P is an abbreviation for HTML5 Package – interactive content such as presentations, videos and other multimedia, questions, quizzes, games and more. The H5P activity enables H5P to be uploaded and added to a course.
Any question attempts are marked automatically, and the grade is recorded in the gradebook.
To learn more about this content, visit the Adding H5P Interactive Content guide.
Types of Resources
A label is simply a bit of text and/or graphics that you can add to the top of each course main page in each topic or week. You can use labels to add a unit title, a short introduction or explanation, or brief instructions telling your learners what to do next.
The page resource is a simple page you can use for instructions or some basic information. This creates a link to a screen that displays the content that you created. The Text editor allows the page to display many kinds of content such as plain text, images, audio, video, web links, embedded code, or a combination of all these. For large amounts of content, it is recommended that a book is used rather than a page.
The book resource is a multi-page resource in a book-like format, with chapters and subchapters. Books can contain media files as well as text and are useful for displaying lengthy passages of information which can be broken down into sections.
A book may be used to display reading material for individual modules of study, to serve as a staff departmental handbook or as a showcase portfolio of student work.
The file module enables a teacher to provide a file as a course resource. Where possible, the file will be displayed within the course interface; otherwise students will be prompted to download it. The file may include supporting files, for example an HTML page may have embedded images.
Note that students need to have the appropriate software on their computers to open the file.
A file may be used to share presentations given in class, to include a mini website as a course resource, or to provide draft files of software programs so students can edit and submit them for assessment.
You can add a file in the course main page when editing is turned on by dragging and dropping it or by clicking an Add an activity or resource link and selecting File.
If you need your students to access many files that you have uploaded, displaying directory, depicted as a folder, that contains all the files on the course main page is simpler and easier for your students. You can structure folders by unit, theme, or types of files, such as links to resources or lecture notes. Your students can open the folders and subfolders and open the files they need from there instead of scrolling through many different files.
The URL resource is a module that provides a web link as a course resource. Anything that is freely available online, such as documents or images, can be linked to; the URL does not have to be the home page of a website. You can use the URL resource to provide your students with web links for research, saving the student time and effort in manually typing out the address. The URL of a particular web page may be copied and pasted or you can use the file picker and choose a link from a repository such as Flickr, YouTube or Wikimedia (depending upon which repositories are enabled for the site).
There are several display options for the URL, such as embedded or opening in a new window and advanced options for passing information, such as a student’s name, to the URL if required.
Note that URLs can also be added to any other resource or activity type through the text editor.
Add an Activity or Resource
- Click the Turn Editing On button in the upper-right corner of your course main page. Editing icons and links will appear.
- Locate the section or week or topic where you want the activity or resource to appear and click the section title to open if it is collapsed.
- Press the + Add an activity or resource button. The Activity or Resource Chooser will open.
- Click the info
 button to see the description of an activity or resource. Select the desired activity or resource, then double-click or click Add. The Add Activity or Resource page will open.
 - Click Add. The Settings page for the activity or resource will open.
- Configure the settings for the activity or resource. Depending on the type of activity or resource you have chosen, you will have different settings options. Click the headings to view those settings or Expand all (top right) to view all settings.
- Complete all required fields, then click Save and return to course or Save and display.
Note: Some activities and resources, including Books, Quizzes, Glossaries, and Databases, require additional setup from within the activity or resource. If you returned to the course main page, click the activity or resource to open and complete your set up.
Once you have added an activity or resource, you can:
- Move the activity or resource link on the course main page with the Move
 icon. You can drag items between Sections.
 - Configure the settings for the activity or resource. Locate the activity or resource you want to configure and click the Edit link, then Edit settings
 . This will bring you to the settings page.
 - Hide an activity or resource that you are not ready to release to students or show a hidden activity or resource. Locate the activity or resource you want to hide or show and click Edit (to the right of the item). From the drop-down menu, select Hide
 or Show
  .
. - Change your role to Student to test submitting an activity (e.g., to submit and test scoring on a quiz) by locating your Profile link in the top right corner (you will see your name and your set profile image). Click on either your name or the image to open the drop-down menu, then select Switch role to… from the drop-down menu. A new page will open, select Student.
General Settings
Each of the setup pages for all activities and resources has several groups, each containing any number of steps, always ordered in the same sequence. You see these setup pages when you set up a resource, such as linking to a file, or an activity like a forum discussion or a quiz. Specific activities have other settings particular to the activity, such as setting dates (for instance, for a chat or forum discussion) or linking to a Web site or file. The following section summarizes the settings that appear in all activities and resources and explain some of the conventions.
Common Module Settings
In the Common Module Settings area (see image below), choose whether you want to make the activity or resource visible to your students. (Other resources and activities have a few more Common Module Settings.) Selecting Show on course page from the availability drop-down list makes it visible to your students. If you select Hide from students, it will be hidden until you want to make it available for viewing. This option may be useful if you are planning a few weeks ahead and you want to coordinate topics. You can make it visible by updating the activity or resource and changing this option, or from the course main page, click the Hide icon when editing tools are on.
Setting an ID number provides a way of identifying the activity or resource for purposes such as grade calculation or custom reporting. Otherwise, the field may be left blank.
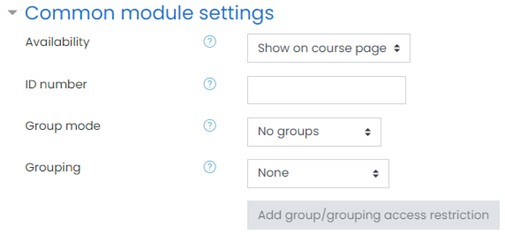
In some setup pages, Group mode will be available. It has three options: (Note that you must have groups in your course to use this feature.)
- No groups – There are no subgroups, everyone is part of one big community
- Separate groups – Each group member can only see their own group; other groups are invisible.
- Visible groups – Each group member works in their own group but can also see other groups.
For example, enabling either separate or visible groups on an assignment drop-box enables staff to filter the student submissions to see only those from a particular tutor group. With visible groups, students can see which other groups are doing the same activities as they are; with separate groups, they do not know which other groups are doing the same activities.
Using groups with discussion forums allow teachers to restrict interaction between students. Separate groups mean only students in the same group can see and participate in discussions within a particular forum. Visible groups allow students to see other group’s discussions, but only participate in their own group’s discussions.
Note: Where visible groups are used or the participant can access all groups, the user’s own group is shown first, followed by other groups.
Restrict Access Settings
You can limit the availability of the activity or resource. Click the Add restriction button. Restriction can be based upon activity completion, date, grade, or user profile fields. The ‘Restriction set’ button also allows for more complex criteria requiring nested conditions. If there are no restrictions added, the restrict access area will be like the image below.

If there are many restrictions added, the restrict access area will look like the image below. Further restrictions may be added by clicking the Add restriction button again, and it is possible to specify that ALL the conditions or ANY of the conditions are required before the activity or resource is made available. Thus, it is possible to use ‘Or’ as well as ‘And’ conditions. Additionally, you can indicate if the student MUST or MUST NOT comply with the added restrictions.
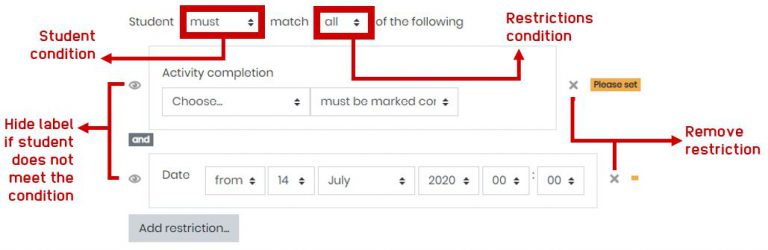
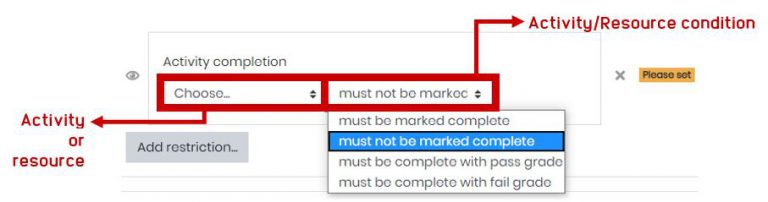
- Activity Completion – As shown in below, select the activity or resource and choose whether it must be marked complete, must not be marked complete, must be complete with pass grade, or must be complete with fail grade. The student will only be able to see the added activity or resource if the condition is met.
- Date – Access can be restricted FROM or UNTIL a certain date and time.

- Grade – You can specify a condition on any grade in the course: the full course grade, the grade for any activity, or a custom grade that you create manually. You can enter either a minimum value (at least percentage), a maximum value (less than percentage), both, and neither. The activity will only appear if the student has a value for the specified grade, and if it falls within any specified number range. You can add more than one grade condition. All conditions must be met for the activity to appear.
- The range numbers can be fractional (with up to five decimal places) if necessary.
- Be careful with the maximum value; if the maximum is 7, a student who scores exactly 7 will not see the activity. You could set it to 7.01 if you really wanted to include 7.
- If creating several different activities that appear according to grade ranges, use the same number for the maximum of one activity, and the minimum of the next. For example, you might create one activity with a maximum of 7 and another with a minimum of 7. The first would appear to everyone scoring between 0 and 6.99999, and the second would appear to everyone scoring 7.00000 to 10. This guarantees that everyone with a grade will see one or other. To remove a grade condition, set the assessment name to ‘none’ and remove the range number values.
- If you want to use a condition for students with blank grades, then you can add a grade restriction and select the activity you want to use as a restriction. Do not select a checkbox for either the greater than or less than criteria. This will require the student to have a grade. This means students with blank grades do not meet that criterion.

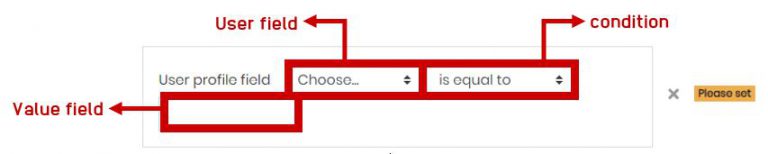
- User Profile – Access can be restricted using one of the following user fields:
Address – This is the value in the ‘address’ column
AIM ID – This is the value in the ‘aim’ column
City/town – This is the value in the ‘city’ column
Country – This is the two-letter country code, NOT the name of the country.
Department – This is the value in the ‘department’ column
Email Address – This is the value in the ’email’ column
First name – This is the value in the ‘firstname’ column
|ICQ number – This is the value in the ‘icq’ column
ID number – This is the value in the ‘idnumber’ column
Institution – This is the value in the ‘institution’ column
Mobile phone – This is the value in the ‘phone2’ column
MSN ID – This is the value in the ‘msn’ column
Phone – This is the value in the ‘phone1’ column
Skype ID – This is the value in the ‘skype’ column
Surname – This is the value in the ‘lastname’ column
Web page – This is the value in the ‘url’ column
Yahoo ID – This is the value in the ‘yahoo’ columnConditions for the user field include is equal to, contains, does not contain, starts with, ends with, is empty, and is not empty. If you chose is empty or is not empty, leave the value field blank.
Access can be restricted using one of the following user fields:
- Restriction set – This allows you to add a set of complex restrictions to apply complex logic
Activity Completion Settings
In the Activity completion area, Activity completion allows the teacher to set completion criteria in a specific activity’s settings. There are three choices:
- Do not indicate activity completion – this will not show checks (ticks) next to the activity
- Students can manually mark the activity as completed – students press the check (tick) to change it. (Note: they can do this even without doing the activity!) Tick off the box beside Enable to specify the date when the activity is expected to be completed.
- Show activity as complete when conditions are met – the selected completion criteria must be met before the check (tick) will change style. If this is selected, Require view will appear. When this option is ticked, students have to view the activity i.e. click the link in order to complete it. You should not turn on the ‘view’ condition if you have other requirements – this makes extra work for the server and it’s unlikely that a student could meet any other conditions without viewing the activity.

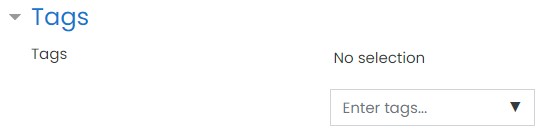
Tags Settings
Tags area allows you to connect different types of content on the site. The following areas may be tagged:
Courses
Activities and resources
Forum posts
Database entries
Glossary entries
Books
Quiz questions
Wiki pages
Blog posts
User interests